
You set up a board in three stages: create it (creation dialog), maintain its properties (master data) and define how it looks (Settings / view).
1. Create the board
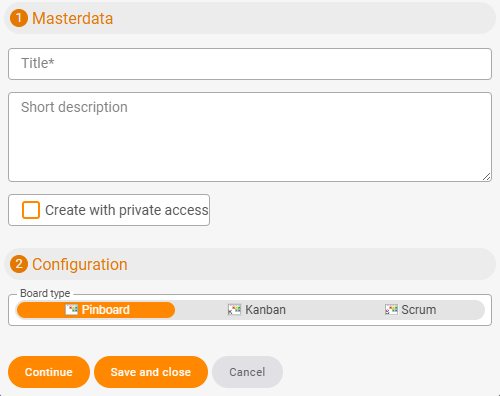
You create boards via the plus sign in the main view or via the action box in the respective tile (pin, Kanban, Scrum boards). The creation dialog is the same everywhere.
In the dialog you enter the basic data:
- Categories – freely chosen; can later be stored on tasks and used as a filter.
- Groups – freely chosen; they help with organisation and can shape the board visually (e.g. as rows or columns). Via Options you enter any of your own values; you can also rename the label “Group” itself (e.g. to “Letter grouping”).
- Create as a private page – the board is then only visible to you.
- Type –
pin board,KanbanorScrum; determines the default statuses (see Board types).
Finish with Next (straight to the next fields) or with Save and close.
2. Maintain master data
After creating the board, you make further settings in the master data:
- Sorting – order in the board list.
- Main topic – highlights the board more prominently in the list.
- Keywords – tags by which the board can later be found.
- Author – the creator; usable as a filter.
Under “Update pin board with open tasks” you link the board with open tasks from other modules – this is a use case of its own and is described in detail in Bring tasks & elements onto a board.
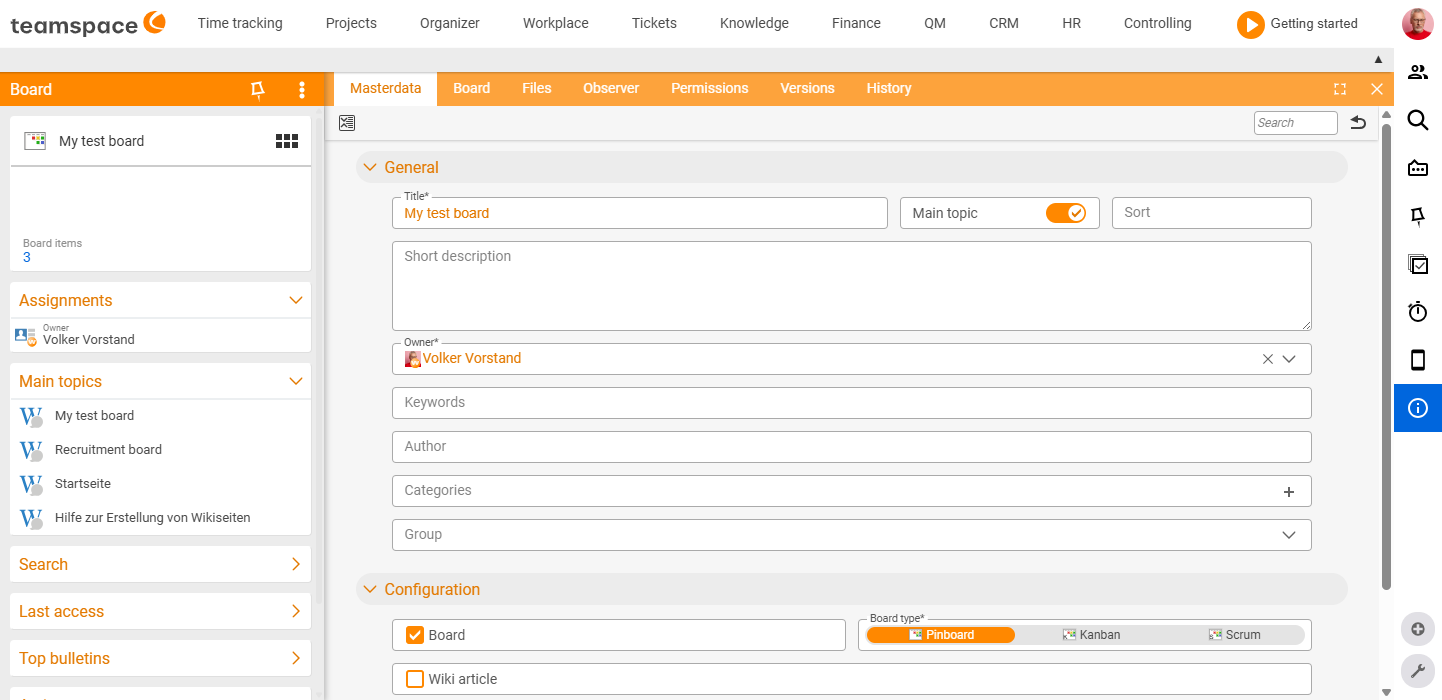
3. Settings and view
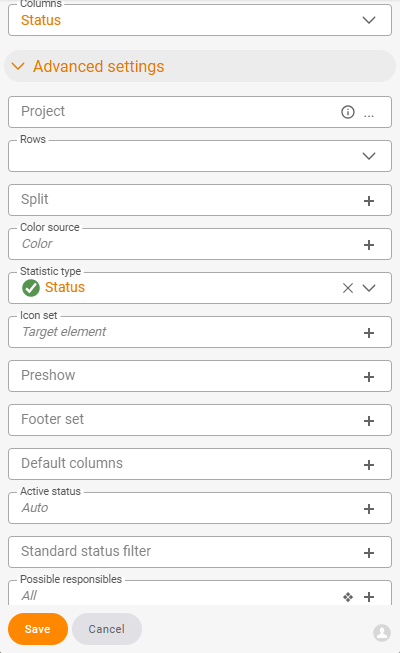
Via the green “Settings” action on the board you define how the board looks. The board type only provides a starting configuration – the options are the same for all types:
- Default view – list or tile view.
- Type – pin, Kanban or Scrum.
- View size – size of the task cards (three levels); controls how much information appears on a card.
- Columns – which parameter forms the columns: status, relevance, assignee, type (element type) or group.
- Rows – labelling of the rows (analogous to columns).
- Split – split cards additionally (e.g. in list view), also multiple times.
- Colouring – card colour by status, relevance or individual colour.
- Icon design – icon on the card: linked element (default), status, relevance, assignee, colour or your own icon.
- Footer – with medium/large card size, additional info (status, relevance, colour, linked element, assignee, due date, icon, comment).
- Statistics type – a pie chart for the board (by status, relevance, colour, element or assignee).
- Active columns / active statuses – which columns or statuses are visible.
- Default status filter – which statuses are shown by default (e.g. hide “Archived”).
- Possible assignees – which people work on the board.
- Group / categories – freely selectable and usable as a view or filter.
Example: Three custom columns (A, B, C)
You create freely named columns via the Group field:
- When creating the board (or later in the master data), enter your three values in the Group field under Options:
A,B,C. If needed, rename the “Group” label to suit (e.g. “Letter grouping”). - Open “Settings” and choose the parameter Group for Columns.
- Via Active columns you show only the values you want to see.
The board now displays the three columns A, B and C. In the same way you can define your own rows.
The group options created here apply only to this board – they are not available to other boards.
Notes
- All defaults of the board type can be changed afterwards; nothing is fixed.
- If you use the board for a team, control access via the board permissions.
Common questions & needs
| You want to … | How to |
|---|---|
| Custom columns with custom names (e.g. A, B, C) | Fill the Group → Options field and choose Group as the column parameter in the settings (see the example above). |
| Columns by processing status | Choose the parameter Status for Columns; control the active statuses via Active columns / active statuses. |
| Columns per assignee | Choose the parameter Assignee for Columns and define the people under Possible assignees. |
| Hide certain statuses (e.g. “Archived”) | Use the Default status filter to define which statuses are shown by default. |
| More/less info on the cards | Adjust the View size and configure the Footer for medium/large cards. |
| Distinguish cards by colour | Under Colouring, colour by status, relevance or individual colour. |
| An analysis for the board | Activate the Statistics type (pie chart) by status, relevance, colour, element or assignee. |
| Tasks from a project automatically onto the board | Use “Update pin board with open tasks” in the master data – see Bring tasks & elements onto a board. |
| A board just for you | Choose “Create as a private page” when creating it; for small to-dos the Personal pin board is a good fit. |
| Use the board in a team | Control access via the board permissions. |
| Find the board more easily | Maintain Keywords, Main topic and Sorting in the master data. |
| Change the board type afterwards | All defaults can be freely changed – switch under Type in the Settings. |
Related topics
- Board types Boards Concept
- The detail manager of a board Boards Concept
- Customise Kanban boards