


You create an appointment wherever it comes to mind — in the calendar, on a CRM contact, in a project or on a ticket. In the creation dialog you set the name, time, participants and availability; with Save and close the appointment is in the calendar, with Next you land in the detail manager for fine-tuning.
Three ways into the creation dialog
teamspace has no single place to create one — the dialog is the same everywhere, only the prefilled values change:
- Directly in the calendar: click a free slot in the week or month view. The date and time are prefilled, and you are listed as a participant.
- Via the plus button in the module modal: in the
Bookmarks area Organizer, the drop-down to the right of the search field offersNew appointmentandNew resource. - From another module: on a CRM contact, a project or a ticket you find the
New appointmentaction in theActionssidebar. The appointment is automatically attached to the record you came from, and the main contact is listed as a participant.
There is also the cross-module Create new… modal, opened via the plus icon at the bottom right of the right-hand vertical bar; in the Other section it offers New appointment as a system-wide shortcut.
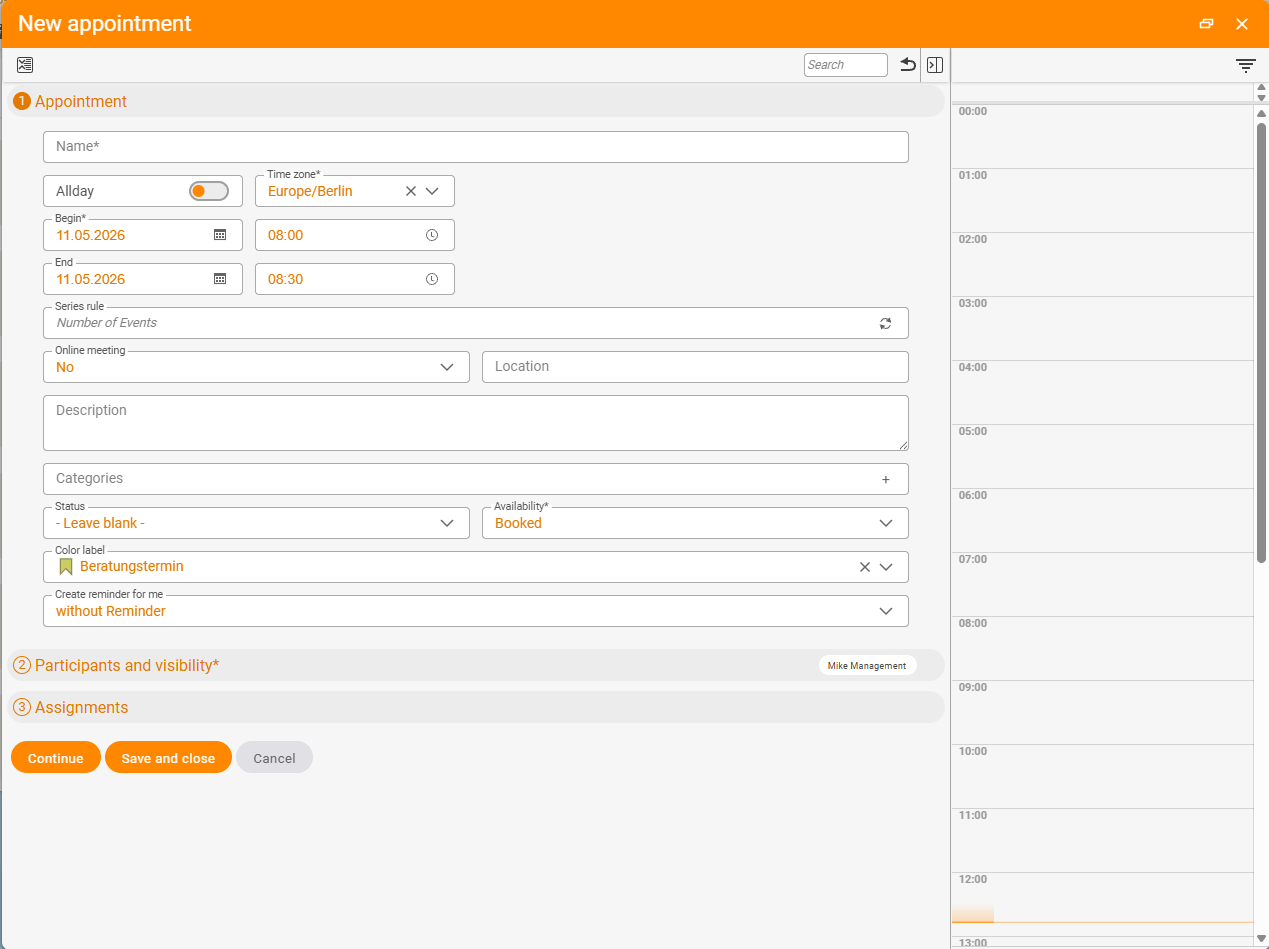
The mandatory fields
In the dialog, the appointment fields sit in the Appointment accordion (open by default). Mandatory fields are marked with *:
Name*: a short, unambiguous label. Appears later as the appointment title in every overview.Time zone*: defaultEurope/Berlin. Switch it here for external participants in a different time zone.Start*: date plus time.End: date plus time. The default is half an hour afterStart.Availability*: how you appear to others during that time.
The All day toggle hides the time fields when the appointment should take up the whole day (a training course, say).
Setting the availability
The Availability field controls whether teamspace shows colleagues a clash when they read your appointment as busy time. Four values:
Free: the appointment sits in the calendar but signals no busy time. No clash warning.Tentative: the appointment stands, but colleagues see that the time is soft.Busy: the default for classic appointments. On a clash, the red bar appears in theParticipantstab.Away: likeBusy, plus the “not reachable” signal.
Except for Free, the system shows colleagues the clash. If you set Free (because the appointment is just a reminder, say), you block no scheduling.
Adding participants
You are already listed as a participant when you create the appointment. You choose others in the creation dialog or later in the detail manager:
- Internal participants: via the search or suggestion field on the participant block. Type the name and pick from the list.
- External participants: contacts without a teamspace account. Using the same search field you find CRM contacts; alternatively, type an email address directly. External participants get the invitation by email — and, for Microsoft Teams appointments, the meeting link along with it.
As soon as several participants are on the appointment, the Participants tab in the detail manager helps you find a free time — it shows an availability timeline per person with grey bars for booked times. Details in Edit an appointment – the detail manager.
Save, or carry on into the detail manager
Two ways to save:
- Save and close: creates the appointment and closes the dialog. You return to the calendar.
- Next: creates the appointment and opens the detail manager. Useful when you want to set permissions, alarms or the recurrence straight away.
ℹ If you close the creation dialog without saving, the appointment is not created — there is no auto-save.
Online meeting, location and colour
Online meeting: a drop-down,Noby default. With the Teams interface set up, you select Microsoft Teams here — teamspace creates the meeting and link automatically (see Create a Teams meeting). For Zoom, Google Meet or Webex you enter the link manually inDescriptionorLocation.Location: free text, such as an address or meeting room.Colour marker: a drop-down with predefined colours (e.g.Consultation). Colours are set by the administrator in the calendar topic.Categories: freely combinable keywords on the chip field — handy for filtering later.
Recurring appointment
If the appointment should repeat, open the Recurrence accordion in the Properties tab of the detail manager and define a rule — daily, weekly, monthly, with an interval. A Termination rule ends the series after a fixed number of occurrences or on a fixed date.
⚠ When you later change a series, teamspace asks whether only the single occurrence or the whole series is affected. A changed single instance drops out of the series and no longer follows later rule changes.
Appointment polls for finding a date
If the shared date is not yet fixed, an appointment poll helps: you propose several time slots, the participants vote, and you turn the winner into a fixed appointment. The poll function is offered in the calendar via the appointment actions; whether it is available depends on the calendar topic (the Polls switch).
Common problems
Why does my appointment not block scheduling for colleagues?
Availability is set to Free. With this value the appointment does sit in the calendar but signals no busy time to colleagues — no clash warning appears. For classic appointments, set Busy.
Why can’t I set Online meeting to As a Microsoft appointment?
Then your assignment to the Entra ID account is missing — teamspace cannot create the Teams meeting on your behalf. The administrator handles the assignment (see Set up Teams integration).
Why is my changed series instance no longer connected to the series? If you change a single occurrence, it drops out of the series and no longer follows later rule changes. This is intended — if you want to change the whole series, choose the option for the entire series in the prompt.
Why has my appointment gone after I closed the dialog? The creation dialog does not save automatically. If you close it without Save and close or Next, the appointment is not created.
Common questions & needs
| You want to … | How to |
|---|---|
| A quick appointment in the calendar | Click a free slot in the week/month view — the date/time are prefilled. |
| An appointment on a CRM contact | In the contact, use the New appointment action — the appointment is attached to the contact automatically. |
| Block the whole day | Switch on the All day toggle (the time fields disappear). |
| Signal no busy time | Set Availability to Free — no clash warning for colleagues. |
| Invite externals without a teamspace account | Enter the email address directly in the participant search field — the invitation goes by email. |
| Set permissions/alarms straight away | Go into the detail manager with Next instead of Save and close. |
| The appointment as a Teams meeting | Set Online meeting to As a Microsoft appointment (the interface must be set up). |
| A recurring appointment | In the detail manager, set the Recurrence accordion + Termination rule. |
| Have an appointment voted on | Create an appointment poll with several time slots. |