With the teamSync phone interface you connect PhonerLite to projectfacts: you can see who is calling before the conversation starts, quickly reach contact details and service notes, and create tickets or appointments during the call. The call log also lets you record and allocate support time.
Prerequisites
You need a Windows system, the PhonerLite tool and the .NET 5.0 framework.
- PhonerLite is freeware (free to use in business too) and enables calls via the SIP protocol. For this you need a phone system or a provider that supports SIP. Vendor site: lite.phoner.de.
- .NET 5.0 framework: official download page at Microsoft.
Before you can use the interface, you must activate and set it up in the system (see below). If you run into problems, our consulting team will help you.
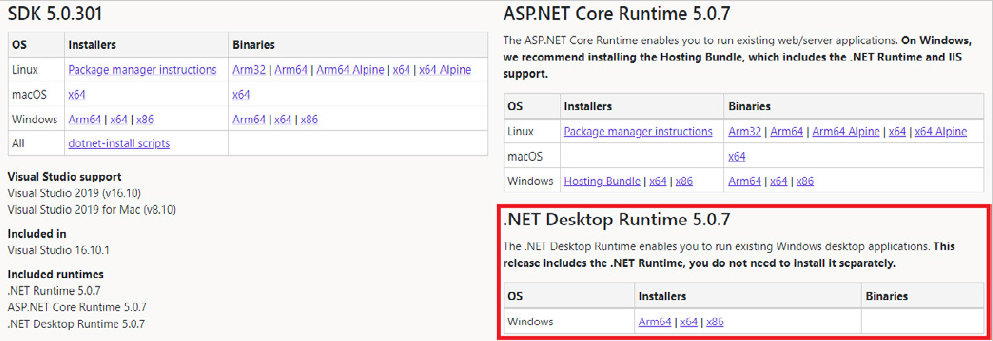
1. Install .NET 5.0
From the official download page, download the .NET Desktop Runtime in the x64 architecture (this is sufficient). Run the installer and follow the steps.
2. Install PhonerLite
If PhonerLite isn’t installed yet, download it from the official download page, run the file and follow the steps.
The specific PhonerLite setup depends on your phone system or provider – we can’t give a one-size-fits-all guide for it. If you run into problems, our administrators are happy to advise.
3. Install the teamSync phone interface
Download the current installer from the download page and run it.
By default, the application is installed in your user folder:
C:\Users\%Username%\teamSync-TelefonschnittstelleA desktop shortcut teamSync-Telefonschnittstelle Einstellungen is also created, which you use to carry out the configuration.
4. Activate the phone interface in the system
So that the interface and its associated URLs are available, add an interface of type Phone interface:
- Click your user picture in the right-hand sidebar, then Configuration.
- In the General category, open the Interfaces list.
- Add a new interface of type Phone WebHook (action URL).
- Give it a name (e.g. Phone interface) and set it to Active.
- Save – the interface is now created in the system.

5. Configure the phone interface in your personal settings
- Click your user picture in the right-hand sidebar, then Personal settings.
- Switch to the Phone interface group, scroll down and expand it if necessary.
- Under “Phone interfaces”, choose the entry “PhonerLite phone connection”.
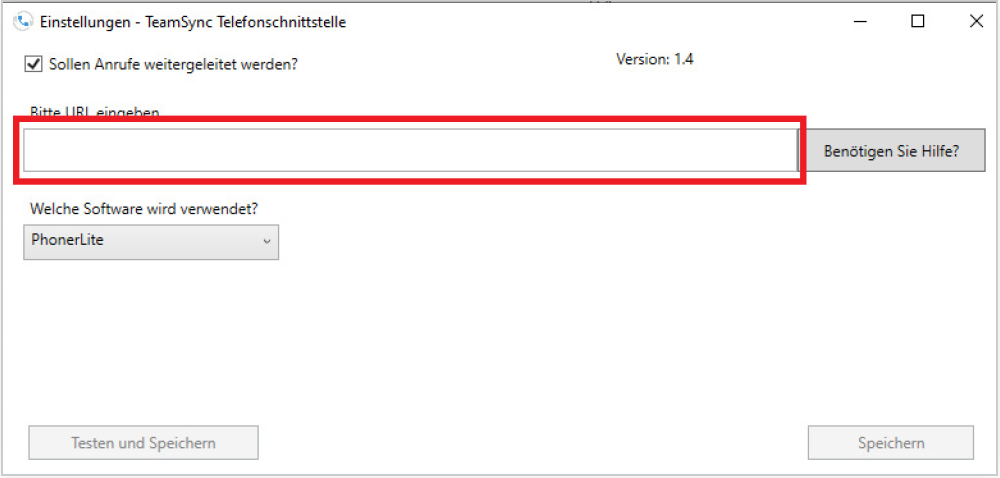
- Copy the displayed URL to the clipboard.
- Open the teamSync-Telefonschnittstelle Einstellungen via the desktop shortcut and paste the URL into the highlighted text field.
- Use Test and save to check that everything works.
On a successful test call you can run through a complete call cycle (call, answered call, ended call). The test call appears in your system under the number 123456789 and can be run multiple times.
Stop forwarding: To stop forwarding calls, clear the Should calls be forwarded checkbox.
6. Connect PhonerLite to the phone interface
- Open PhonerLite, click Options and choose External applications.
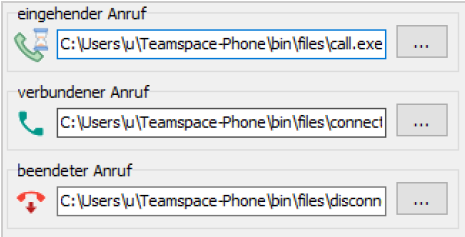
- For the three cases, assign the correct program from the installation folder. For each case, click the three-dots field and navigate to the location:
C:\Users\%Username%\teamSync-Telefonschnittstelle(Replace %Username% with your username, or navigate there via the file picker dialog.)
3. Assign the programs:
- incoming call → call
- connected call → connected
- ended call → disconnected
- Click Save. Setup is now complete and calls in PhonerLite are forwarded to your system.