


An MCP access without tools can do nothing. On the Tools tab you define what an assistant may do through this access – and this is the step that decides whether the access later works briskly and accurately or sluggishly and imprecisely.
The “Tools” tab
Configuration → Interfaces → MCP configurations → <open the access> → ToolsThe tab shows the complete tool catalogue, grouped into categories such as General tools, Open items, Projects or Tickets. Each category can be expanded and carries a short explanation, e.g. “Tools for managing open items”. Every tool comes with two things:
- a toggle – switched on, the tool belongs to this access,
- the Allowed operations field – what the tool may do, e.g. Read and Write.
At the top, the Active filter switches between All, Yes and No; with “Yes” you see only the tools that are switched on – in other words, what the assistant will be offered. The Search field at the top right finds a tool by its name.
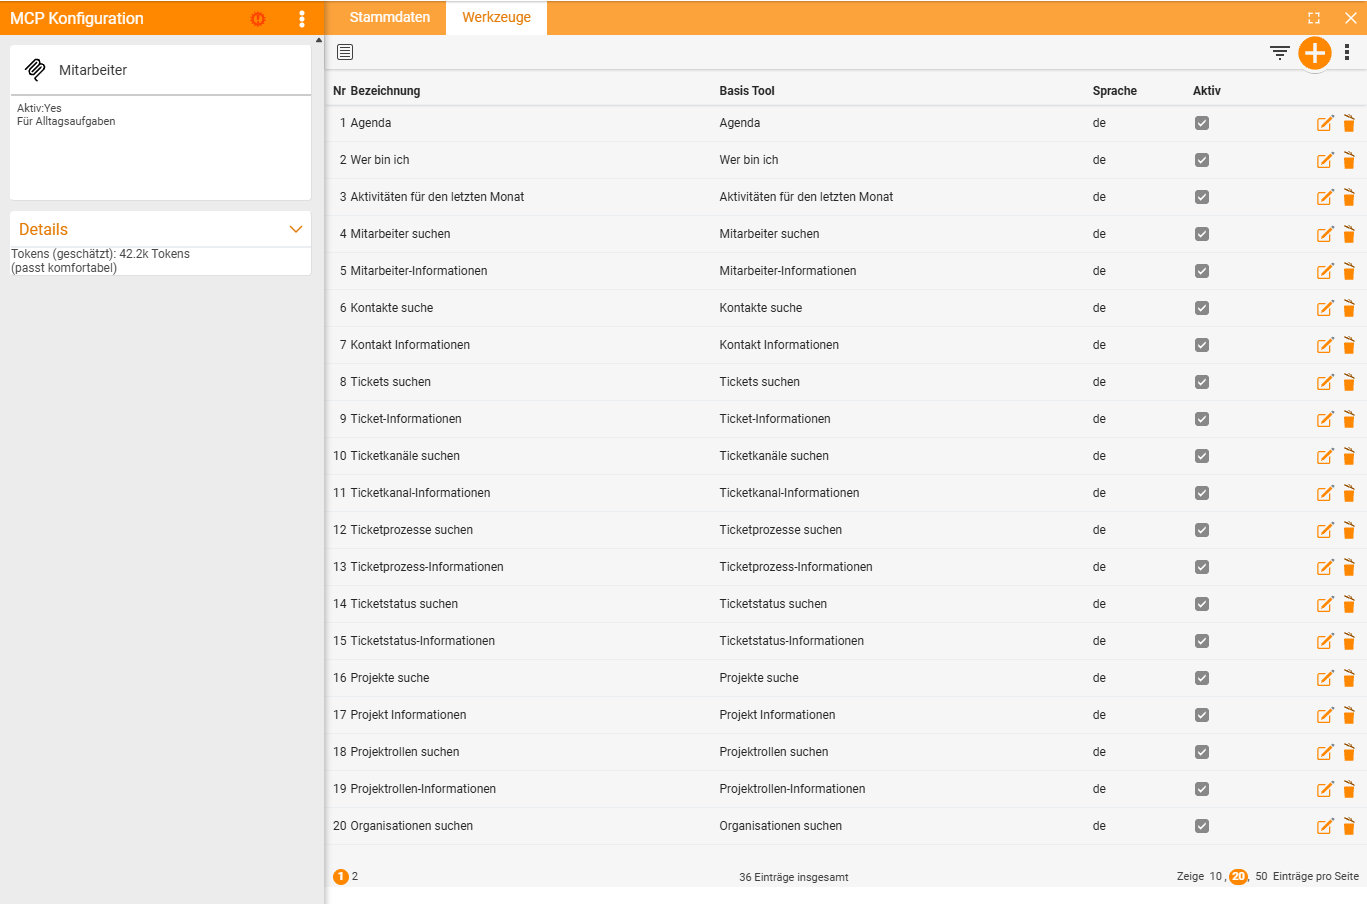
The details panel on the left sums up the access: whether it is active, which operations it allows, how many tools are active and which user groups may use it. Below that, the Connect MCP client area shows the server URL with a copy button – handy when you want to pass the address on.
Under Details you’ll find the decisive figure:
Tokens (estimated): 0.0k tokens (fits comfortably)Why the token estimate matters
It is not a statistic but a warning light.
An assistant is handed the complete tool list when it connects, and it has to keep it in mind on every single question. That list occupies space in the model’s working memory – measured in tokens. The more tools, the larger the list, the less room remains for the actual task, and the longer every reply takes.
On top of this comes a second, more unpleasant effect: the more similar tools there are to choose from, the more often the assistant reaches for the wrong one. Twenty tools, six of which do “something with tickets”, are an invitation to mix them up.
The token estimate makes both visible before a user complains. A freshly created access like the one above still sits at 0.0k tokens; every tool you switch on makes the figure grow. As long as it says “fits comfortably”, the estimate gives the all-clear. Even so, with a large access it is worth asking whether all the tools are really needed, or whether two accesses would make more sense: “fits” means it works – not that it is optimal.
Rule of thumb: Two accesses with twelve fitting tools each beat one with twenty-four – even if the same people use both. It costs you one more click in administration and saves every user time on every question.
Switching tools on
- Open the MCP configuration and switch to the Tools tab.
- Expand the relevant category, e.g. Projects.
- Switch on the toggle for the tool you want.
- Under Allowed operations, define what the tool may do – add an operation via the plus and remove it again via the × on the operation.
- Repeat this for all the tools of the access and click Save at the bottom.
What the access allows overall is set in its master data, also under Allowed operations – see Create an MCP configuration.
Which categories and tools exist is covered in Available MCP tools.
How to tailor it
Tailoring works best when you think from the task, not from the catalogue. Not “what is there?”, but “what do these people do all day?”.
- Write down the use case. One sentence: “The sales team wants to analyse contacts and sales opportunities.”
- Switch on the tools that sentence needs. For “analyse contacts”, Contact and Organisation from the CRM category belong in – expenses don’t.
- Add “Who am I”. It costs next to nothing and helps the assistant understand questions like “my tickets” at all.
- Look at the token estimate. If it stays comfortable, you’re done.
- Check Write and Delete one by one. Each of these operations is a deliberate decision, not a by-catch – when in doubt, stick to Read.
An example: an access “Employee” with the description “For everyday tasks” gets by with Agenda, Who am I and Activities for the last month, plus Employee, Contact, Organisation, Ticket and Project – all with Read only. That covers the everyday work of most colleagues, without a tool from Personnel or Documents ever being involved.
Common questions & needs
| You want to … | How to |
|---|---|
| Make an access faster | Switch off tools that don’t come up in the use case. Check via the token estimate in the details panel. |
| Build a read-only access | In the configuration’s master data, leave only Read under Allowed operations – and do the same for the tools. |
| Temporarily disable a tool | Switch off the tool’s toggle and save. |
| See only what the access offers | Set the Active filter at the top to Yes. |
| Know how large the access is | Details panel on the left → Details → “Tokens (estimated)”. |
| Have the assistant understand “my tickets” | Switch on the Who am I tool – without it the assistant doesn’t know the logged-in user. |
| Make an assistant reach for the wrong tool less often | Fewer similar tools in the same access. When in doubt, split into two accesses. |
Notes
- Leaving tools out is not a security measure. What a user may see is decided by their permission profile – see Security and permissions with MCP.
- The allowed operations are the real lever. A tool with only “Read” changes nothing in teamspace; you grant “Write” and “Delete” deliberately and sparingly.
- Changes take effect immediately. On next connecting, the client sees the new list; no one has to set up their connector again.
- The language sits with the configuration. All tools of an access speak the same one – for mixed-language teams, create two accesses.
Related topics
- Create an MCP configuration MCP & AI agents Configuration
- Available MCP tools MCP & AI agents Reference
- How MCP works in teamspace MCP & AI agents Concept
- Security and permissions with MCP MCP & AI agents Concept