
This guide takes you through a complete Windows installation of projectfacts/teamspace. Carry out the steps with administrator rights. You then set up the reverse proxy (Apache) separately.
The guide uses the name projectfacts. If you have teamspace, replace it. The paths may differ on existing installations.
1. Download & install packages
- Tomcat 10 – tomcat.apache.org
- Temurin 17 HotSpot – adoptium.net
- Notepad++ – notepad-plus-plus.org
- 7-Zip – 7-zip.de
- Apache2 – apachelounge.com
- MySQL Server – dev.mysql.com
- MySQL Workbench – dev.mysql.com
2. Links and paths
| Purpose | Path |
|---|---|
| projectfacts | C:\projectfacts |
| userfiles | C:\projectfacts\userfiles |
Tomcat server.xml | C:\Program Files\Apache Software Foundation\Tomcat 10\conf\server.xml |
MySQL my.ini | %programdata%\MySQL\MySQL Server 8.0 |
web.xml | C:\projectfacts\webapp\WEB-INF\web.xml |
data-source.xml | C:\projectfacts\webapp\WEB-INF\conf\data-source.xml |
| Apache ports/SSL/mods | C:\Apache24\conf\httpd.conf |
| Apache sites | C:\Apache24\conf\extra\projectfacts.conf |
3. Installation
- Create the following folders:
C:\projectfactsC:\projectfacts\logsC:\projectfacts\webappC:\projectfacts\userfiles
- Copy the
deploy-war.batand theprojectfacts.warintoC:\projectfacts. - Run the
deploy-war.batwith administrator rights – the.waris unpacked. - Copy the ZIP file for the userfiles to
C:\projectfacts\userfilesand unpack it.
4. Adjust web.xml
Adjust the installation paths in C:\projectfacts\webapp\WEB-INF\web.xml:
<context-param>
  <param-name>path.htdocs.directory</param-name>
  <param-value>/srv/projectfacts/webapp/htdocs/</param-value>
</context-param>
<context-param>
  <param-name>path.data.directory</param-name>
  <param-value>/srv/projectfacts/webapp/WEB-INF/data/</param-value>
</context-param>
<context-param>
  <param-name>timer.mailfetcher</param-name>
  <param-value>30</param-value>
</context-param>
<context-param>
  <param-name>mail.positive_mail_list</param-name>
  <param-value>.*</param-value>
</context-param>
<context-param>
  <param-name>server.url</param-name>
  <param-value>https://projectfacts.mycompany.de</param-value>
</context-param>
<context-param>
  <param-name>webdav.url</param-name>
  <param-value>https://projectfacts.mycompany.de</param-value>
</context-param>- Enter your Windows paths under
path.htdocs.directoryandpath.data.directory. timer.mailfetcher: mail is fetched/sent every 30 seconds (0disables mail traffic).mail.positive_mail_listwith.*allows sending to all email addresses.- Set
server.urlandwebdav.urlto your URL.
5. Configure MySQL 8
Database user: projectfacts · Database name: projectfacts · Password: your choice. The user needs full access.
Import the time zones first, otherwise the MySQL server cannot start (you can find the timezone_posix.sql in teamspace-classic):
mysql -u root -p mysql < timezone_posix.sqlThen edit %programdata%\MySQL\MySQL Server 8.0\my.ini:
[mysqld]
bind-address = 127.0.0.1
skip-name-resolve
skip-log-bin
default-time-zone       = Europe/Berlin
innodb_buffer_pool_size = 1G
max_heap_table_size     = 512M
tmp_table_size          = 512M
innodb_log_file_size    = 256M
group_concat_max_len    = 4096
character-set-server    = utf8mb4
collation-server        = utf8mb4_unicode_ci
sql-mode = 'STRICT_TRANS_TABLES,NO_ZERO_IN_DATE,NO_ZERO_DATE,ERROR_FOR_DIVISION_BY_ZERO,NO_ENGINE_SUBSTITUTION'
Restart the MySQL server.
Import the MySQL database
Contact us to obtain a template of the database structure.
Adjust context.xml
Copy the file webapp\META-INF\context.xml to tomcat10\conf\Catalina\localhost\ROOT.xml. The directory is created automatically the first time the Tomcat starts. In the copied file, adjust docBase, username, password and url.
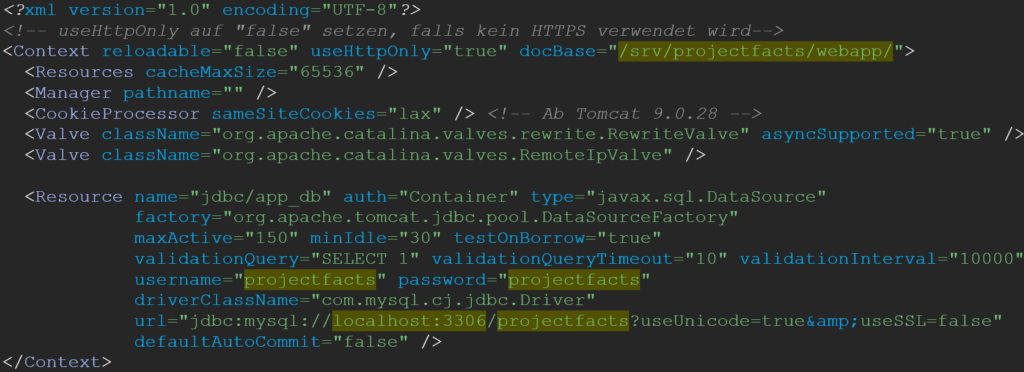
The time zone of the database must match the operating system on which the Tomcat runs. If the database and Tomcat are on the same system, this is normally already the case.
6. Set up Tomcat
From Tomcat version 9.0.92 onwards, your projectfacts/teamspace must be updated to at least 2024.2.68 or 2024.1.72, otherwise you will receive an error message.
In C:\Program Files\Apache Software Foundation\Tomcat 10\conf\server.xml, adjust or add the following lines:
<Listener className="org.apache.catalina.core.AprLifecycleListener" SSLEngine="off" />
[…]
<Host name="localhost" appBase="webapps" unpackWARs="false" autoDeploy="false">
Open the Tomcat Manager and adjust the memory and the default encoding:
- Java Virtual Machine: specify the path to the OpenJDK.
- Java Options: add
-Dfile.encoding=UTF8. - Maximum memory pool: adjust the memory (depending on the server resources).

Nightly Tomcat restart
Create a batch file tomcat_restart.bat in the folder C:\projectfacts\scripte:
@echo off
net stop "Tomcat10"
timeout 30
net start "Tomcat10"
The name of the Tomcat service can differ from system to system – adjust it accordingly.
Create a scheduled task that runs the script daily (e.g. at 04:00). When you do so, tick »Run whether user is logged on or not« – otherwise the script will not run.
Add the Jasper font
- Download the
jasper-font-default-1.2.0.jarfrom teamspace-classic and place it inC:\Program Files\Apache Software Foundation\Tomcat 10\lib. - Create the folder
C:\projectfacts\jasper-font, copy the.jarinto it and create anmklink:mklink /d "C:\Program Files\Apache Software Foundation\Tomcat 10\lib\Jasper-Font-default-1.2.0.jar" "C:\projectfacts\jasper-font\Jasper-Font-default-1.2.0.jar" - Restart the Tomcat.
7. projectfacts update
Create a backup before every update. Only one
.warfile may ever be present; a downgrade is not permitted.
- Download the current
projectfacts-x.x.xx.warfrom teamspace-classic (» Main folder → Current version → READ THE UPDATE NOTES! «) and observe the version notes. - Copy the file to
C:\projectfacts\. - Stop the Tomcat service: press Windows key + R, enter
services.msc, find the Tomcat service and stop it. - Right-click the
deploy-war.bat→ »Run as administrator«. - Start the Tomcat service again.
- Check in the
projectfacts.log(atC:\Program Files\Apache Software Foundation\Tomcat 10\logs\) whether the update was successful, and then remove the.warfromC:\projectfacts\.
Common questions & needs
| You want to … | How to |
|---|---|
| Special characters are displayed incorrectly | Add -Dfile.encoding=UTF8 under Java Options in the Tomcat Manager. |
| Give the Tomcat more RAM | Increase the “Maximum memory pool” in the Tomcat Manager. |
| MySQL won’t start | Import the timezone_posix.sql before adjusting the my.ini. |
| The nightly restart script doesn’t run | Activate »Run whether user is logged on or not« in the scheduled task. |
| Set up the reverse proxy | Continue with Apache as a reverse proxy. |
Related topics
- Setting up Apache as a reverse proxy Installation Configuration
- How teamspace is built Installation Concept
- Performing an update Installation Configuration