


teamspace brings no AI of its own. Before any AI feature appears, an administrator has to enter the endpoint that teamspace sends its requests to, once. After that, you use the rights of the user groups to decide who may use which AI feature. A feature only appears once both are in place.
Why it is done this way and what you should check when choosing a provider is explained in Your AI, your data. This article shows the mechanics.
Where the setting lives
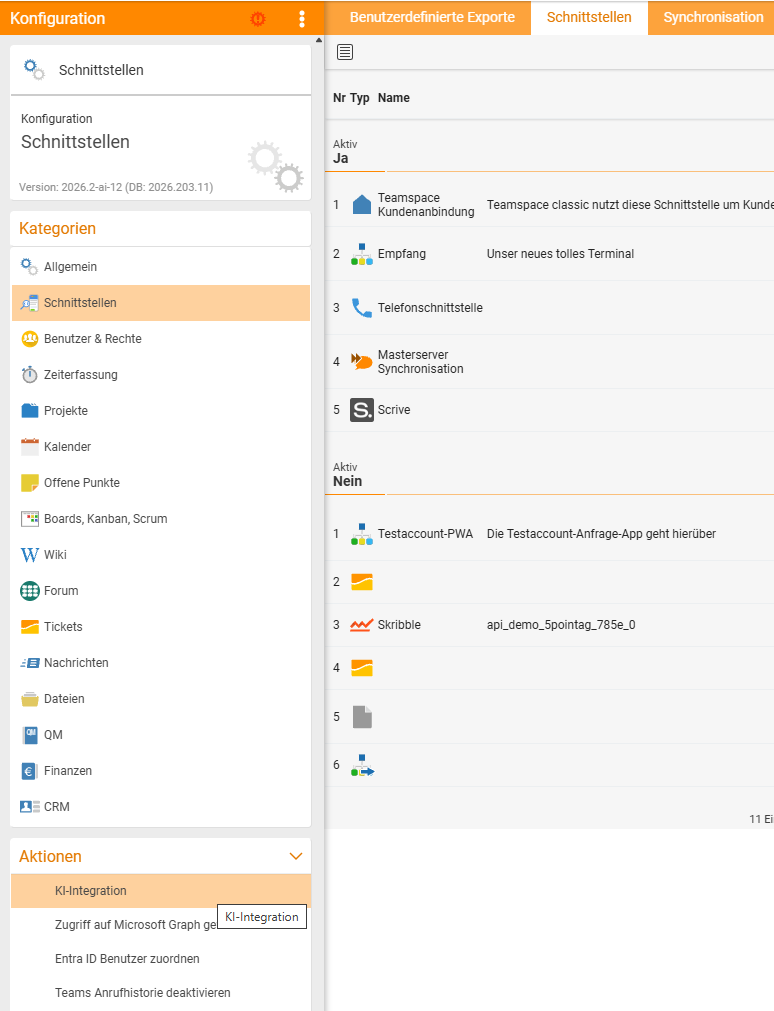
Configuration → Interfaces → Actions → AI integrationThe AI integration is not a tab of its own but an action in the left-hand area of the Interfaces category – below the category list in the Actions section.
Enter the AI
-
Open
Configuration → Interfacesand click AI integration on the left under Actions. -
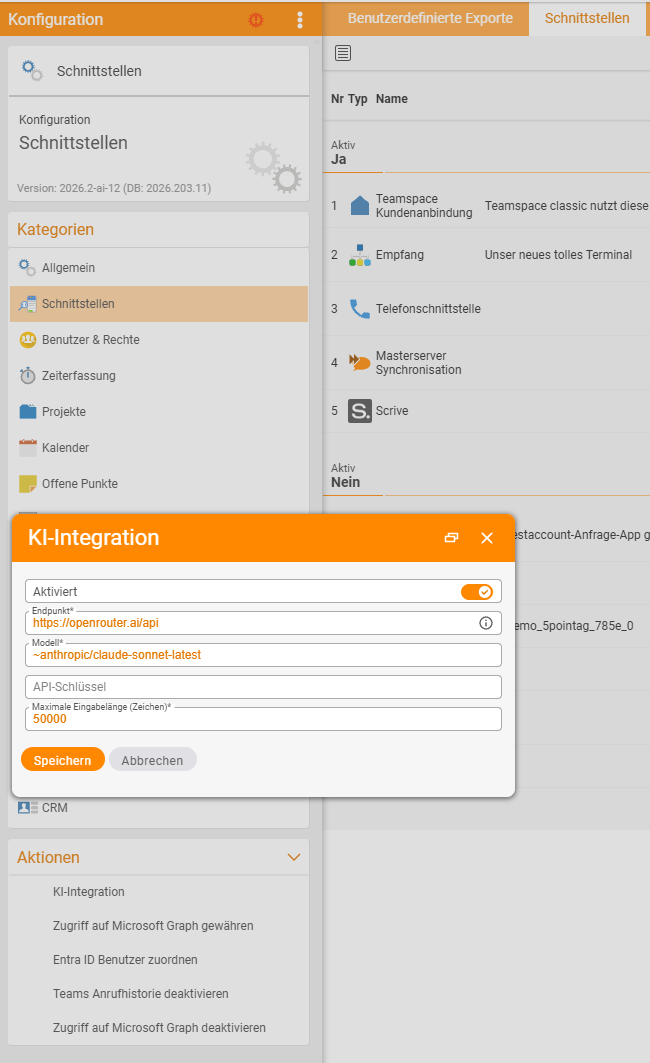
Fill in the fields:
Field Required Meaning Enabled – The main switch. Without it, teamspace calls no AI – whatever the other fields contain. Endpoint yes The address teamspace sends its requests to. This can be a provider on the internet or a model in your own data centre. Model yes The model identifier your provider expects – written exactly as it documents it. API key – Your provider’s access key. For a self-hosted model without authentication, the field stays empty. Maximum input length (characters) yes How many characters a single call may transmit at most. -
Save.
Decide who may use which AI feature
Connecting the AI is not enough on its own. Each AI feature has its own right, which you grant in the user group. A user only sees a feature once both conditions are met:
- An AI is connected and Enabled is switched on.
- One of their user groups has the right for this feature.
This lets you decide for each user who may use a feature and who may not – for example the ticket summary for support and the report analysis only for controlling and management.
Open the user group → Permissions tab → Permissions accordion → Artificial intelligence (AI)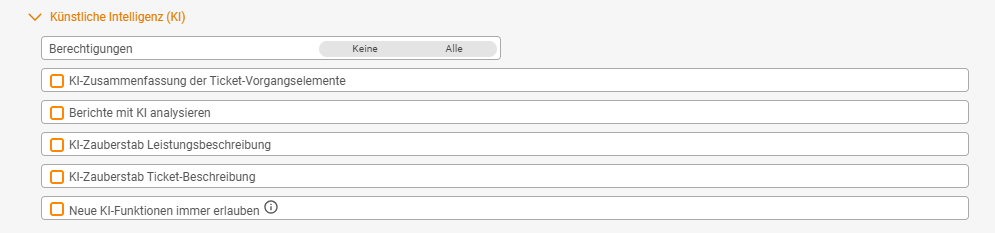
| Right | What it enables |
|---|---|
| AI summary of ticket activity elements | the “Generate ticket matter” action, which condenses a long ticket history (see Condense a ticket history with AI) |
| Analyse reports with AI | the “Analyse with AI” entry in the three-dots menu of lists and reports (see Analyse reports with AI) |
| AI magic wand service description | the AI magic wand on the “Description” field in the project time dialog, which writes the service description from the ticket the time is booked on (see Book project times) |
| AI magic wand ticket description | the AI magic wand at the top right of the “Matter of the ticket” field, which creates the complete matter from the ticket data (see Condense a ticket history with AI) |
| Always allow new AI features | all AI features added in later versions, without you having to grant each new right individually |
At the top of the accordion, the Permissions toggle with None or All sets all rights in the section at once. If a user belongs to several groups, it is enough for one of them to have the right (see How permissions combine).
New features keep arriving, each with its own right. With Always allow new AI features, the group can use a new feature straight away. Without it, each new AI right starts switched off and you grant it yourself – useful if you want to check which data a feature sends to the AI before you roll it out.
Understanding the maximum input length
This field is easily overlooked, even though it governs two things at once.
It caps the cost. Almost all providers bill by the volume transmitted. A ticket with four hundred entries costs many times more than one with four. The limit prevents a single outlier from shaping the monthly bill.
It caps what goes out. Every character above the limit is not transmitted. That is a data protection setting too, not just a cost brake.
A common starting value is in the range of a few tens of thousands of characters – around 50,000. That covers long ticket histories and extensive reports. Don’t set it too tight: if input is truncated, the AI works from an incomplete picture and delivers a summary that gives no sign that half of it was missing.
Check the value against your model. Every model has its own upper limit for input. If your setting is above it, the provider rejects the call and the feature fails instead of trimming.
Check that it works
After saving, the AI features appear in their places – for each user, the ones their user group has the right for. The quickest test:
- Give your own user group the right
AI summary of ticket activity elements. - Open a ticket with a longer history.
- Call up the summary – see Condense a ticket history with AI.
- If a sensible summary comes back, the endpoint, model and key are set correctly.
Common questions & needs
| You want to … | How to |
|---|---|
| Switch AI off completely | Turn off the Enabled switch. Takes effect immediately for all features and all users. |
| Allow a feature for certain users only | Grant the feature’s right only in their user group, under Permissions → Artificial intelligence (AI). |
| Withdraw a single feature from a group | Untick that right. If the user still has it via another group, remove it there too. |
| Be able to use new AI features straight away | Tick Always allow new AI features in the user group. |
| Use a different model | Change the Model field and save. No further action needed. |
| Ensure no data leaves your premises | Run a model in your own data centre and enter its address as the Endpoint. |
| Cap the cost | Lower the maximum input length. In addition, limit the allowance at the provider itself. |
| Know why a feature doesn’t appear | Check Enabled first, then the endpoint and model, then whether one of the user’s groups has the right for the feature. |
| Use a model without authentication | Leave the API key empty – for a self-hosted model that is the normal case. |
Notes
- One endpoint applies to the whole tenant. Not per user, not per module, not per feature.
- The key is yours. teamspace uses it for the calls; allowance and billing run through your contract with the provider.
- No connection, no AI features. They don’t appear at all – to users it looks as if they don’t exist.
- No right, no feature either. If a user lacks the right for a feature, it does not appear for them, even when the AI is connected.
- This applies only to the built-in features. If you connect your own assistant via MCP, you use that assistant’s AI and not this setting at all.
Related topics
- Your AI, your data AI features Concept
- Available AI features AI features Reference
- Condense a ticket history with AI AI features How-to
- Create and manage user groups Permissions Configuration
- Topic: Configuration Configuration