
There are three approaches to keeping order in your project portfolio: project types, archiving (see Tidy up and archive projects) and project directories. This article sets up project types and directories as an admin. Directories and the archive are the ones you can most easily do without – project types are almost always helpful.
Project types
The project type is an absolutely mandatory field for every new project – every project must have a type. Through types, projects become comparable within their group (number per quarter/year, duration, revenue, effort) and can be filtered. The simplest distinction is internal / external / day-to-day business; in-house people often add “customisation projects” and “implementation”.
In the Projects module the overview tile shows the types (e.g. internal projects, implementation projects, consulting projects); a click filters them. You can freely combine the search field at the top with the type filter – search by name, customer name or year.
Create a project type
- Open
Configuration → Projects → Project types– the existing types are displayed. - Create a new type: Name (e.g. “Standard project”) and Abbreviation (e.g. “S”).
- Set the type’s properties (see below) and save.
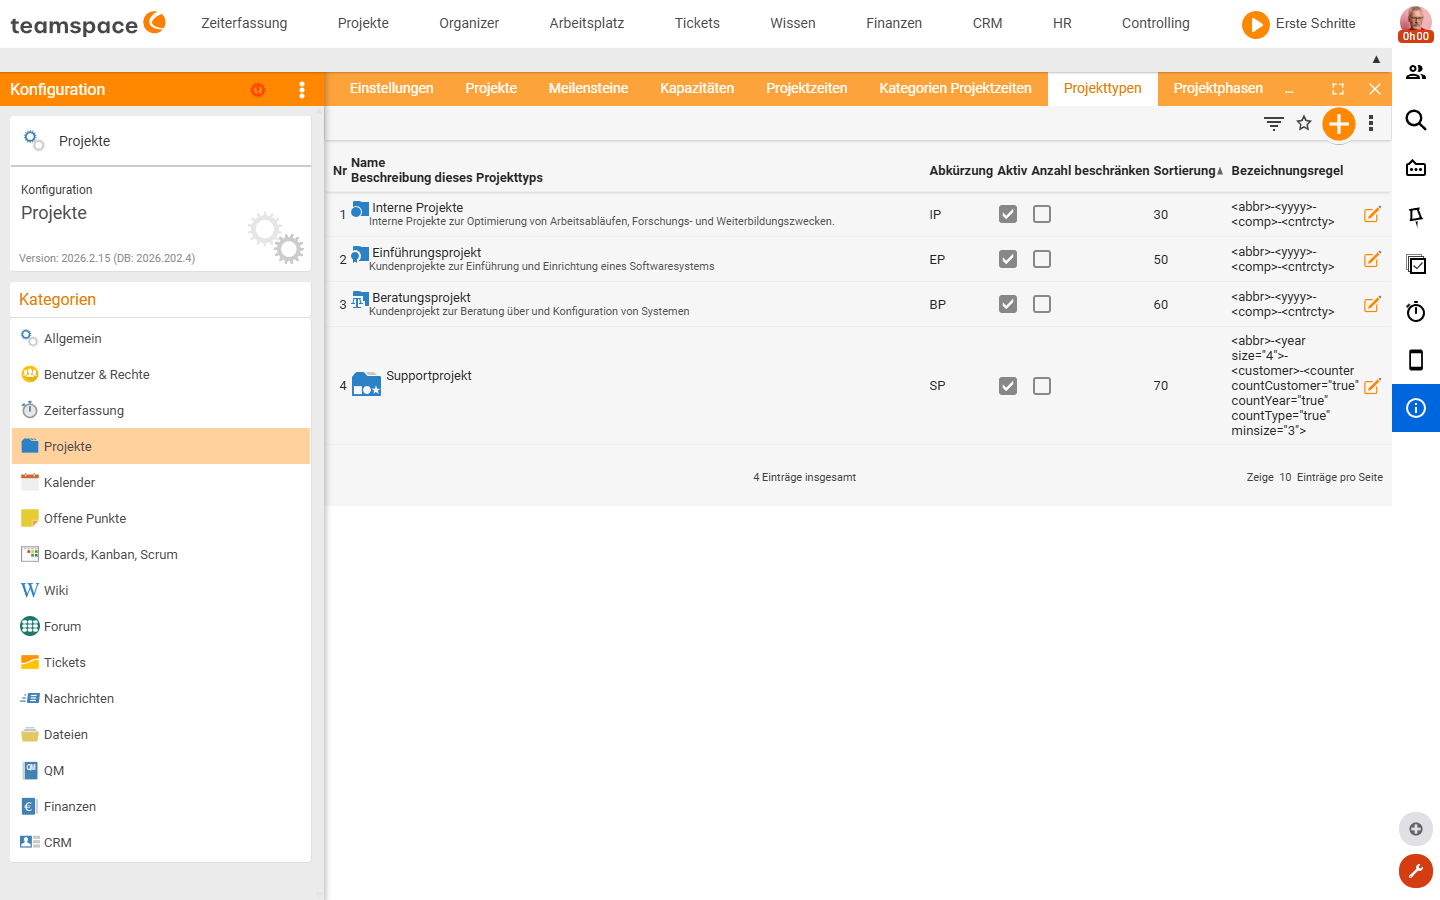
Properties per project type
Most things hang off the project type – this is especially important for external projects and less so for internal ones:
- Preconditions – what must be fulfilled for a project to be startable; otherwise it stays a draft and cannot be started.
- Allow only one project of this type per customer – useful for a standard or “catch-all” project onto which time is booked when nothing else fits; for possible automations it is important that there is only one.
- Workflow and approval rule – the sequence of project statuses and who may trigger transitions.
- Numbering – the naming rule for the project number (see Assign project numbers automatically).
- Further settings for project creation: warning on a poor schedule, strict mode, time budget and synchronisation.
Project directories
Project directories work like file directories: nestable to any depth, with projects placed inside them. They are an additional classification alongside project types. Example: a real-estate company sets up a location/street/building/floor structure. The advantage over the “customer” attribute: if a customer moves, both attributes are preserved.
Activate the submodule
Project directories are a submodule and must be switched on first:
- Open
Configuration → General → Modulesand, under “Projects”, activate the “Project directories” submodule. - Restart the session – the tile only appears afterwards.
- Assign the project directories to the people who are to work with them via the permission system.
Only after activation does the “Project directory” field appear in a project’s master data.
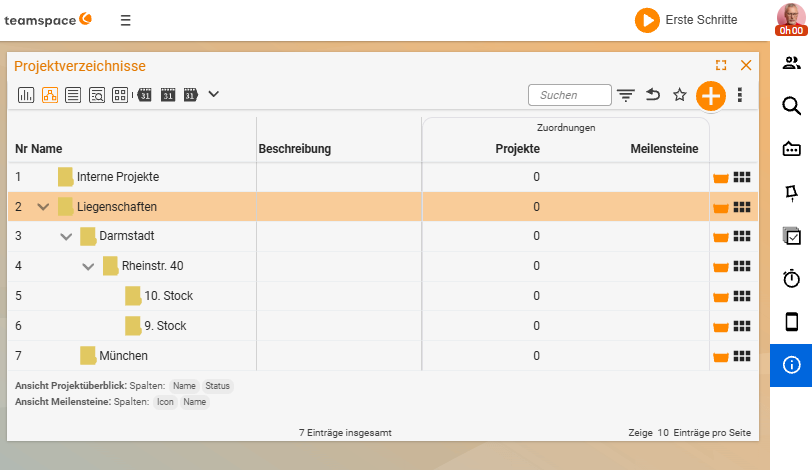
Create directories and assign projects
- Create a directory: Name (e.g. “Real estate”) and a small icon/abbreviation → Save.
- Attach subdirectories (e.g. “Darmstadt” under “Real estate”) – nestable to any depth.
- Assign a project: detail view → master data → Directory, select → Save.
In the project overview there is a second tab: you sort either by project types or by project directories; the directory tree appears at the top to click through.
Practical example: teamspace itself uses four releases per year as four milestones and creates one directory per release, into which it files the projects that are to be finished in that release.
Common questions & needs
| You want to … | How to |
|---|---|
| Create a new project type | Configuration → Projects → Project types → create a new type with Name and Abbreviation, set the properties and save. |
| Prevent a project from starting unfinished | Use preconditions to define what must be fulfilled; otherwise the project stays a draft. |
| Allow only one project of a type per customer | Activate the option “Allow only one project of this type per customer” (e.g. for a standard / “catch-all” project). |
| Steer the status sequence per type | Set the workflow and approval rule on the project type. |
| Define the project-number rule | Set the numbering on the project type (see Assign project numbers automatically). |
| Classify projects additionally (e.g. by location) | Activate the Project directories submodule under Configuration → General → Modules, restart the session and assign via the permission system. |
| Assign a project to a directory | Detail view → master data → Directory, select → Save (the field only appears after the submodule is activated). |
Related topics
- Assign project numbers automatically (with video) Project management Configuration
- Tidy up and archive projects (with video) Project management How-to
- Multi-project management software