
You set up a capacity in three stages: create it (give it a name), maintain the master data and target project (what is being planned) and staff the team (who may be scheduled). How you then distribute the hours across the days is covered in Maintain the resource schedule.
1. Create the capacity
In the main menu Projects, open the Capacities tile. Via the action box you create a new capacity with New and first give it a name. You then land in the detail manager of the capacity – the workspace that bundles everything about the capacity.
The detail manager guides you through the areas across several tabs: Overview, Master data, Projects, Team, Resource schedule, Capacity analysis and Files. On the left sits a sidebar with a quick overview and actions.

The Overview tab summarises the most important values without you having to click deeper: boxes for Master data (start, end, budget, manager), Team (Scheduled, employees), Resource schedule and Projects. Right at the bottom runs the Timeline with the history of the capacity.
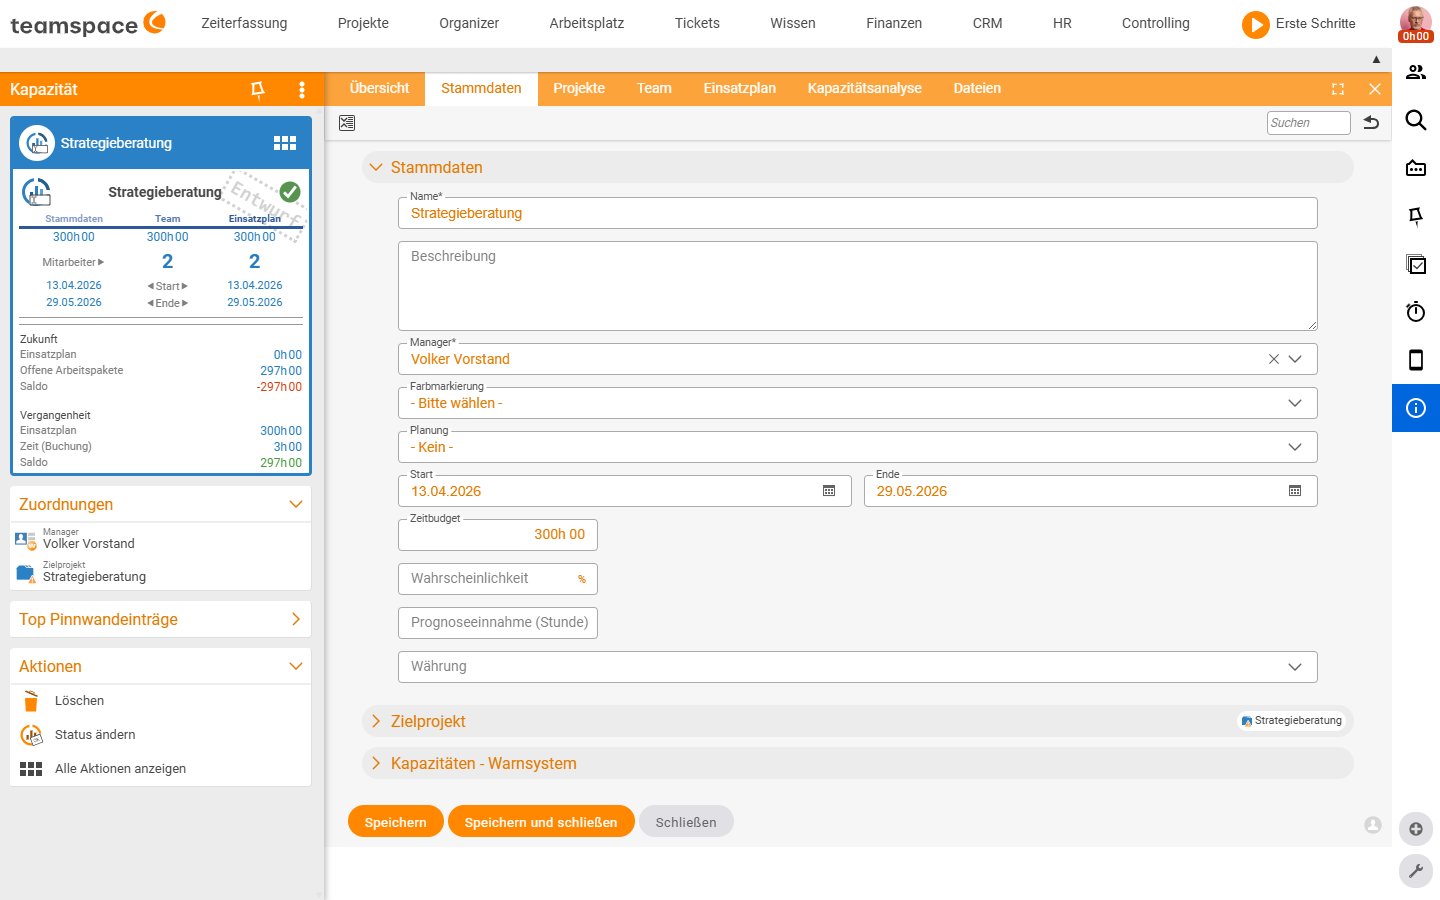
2. Maintain the master data
In the Master data tab you record what the capacity is. The editor is organised into accordions. In the Master data accordion you fill in:
Name(required) – what the capacity is called in lists and reports.Description– free text as context for other team members.Manager(required) – the person responsible for the capacity.Colour marker– a colour from the configuration so the capacity stands out from the others. The same colour list is also used for CRM and appointments.StartandEnd– the period in which the capacity applies.Time budget– the total hours available for the capacity.Probability(in %) – how certain it is that the capacity will actually be drawn on. Important in the quoting phase: at 50% you only reckon with half the budget.Forecast revenue (per hour)andCurrency– the expected revenue per hour. From this the capacity analysis turns planned hours into a revenue preview.
Based on Start, End and Time budget, the system triggers warnings when the resource schedule runs over the thresholds – visible in the check status of the list and in the Overview tab.
ℹ Note. You do not set the status in the master data. You trigger a status change in the sidebar on the left via the
Change statusaction – a dialog asks for the new value and a comment (Draft,In planning,In progress,Completed).
3. Target project and further projects
Every capacity has exactly one target project – the main project it is assigned to. You set it in the Target project accordion within the master data. The target project is highlighted in colour in capacity lists, which helps when several projects access the same capacity. All children of the target project inherit access automatically.
In the target project you can additionally activate synchronisation settings: if the project’s name, time or budget changes, the capacity adopts the change too.
If the capacity is also to serve other projects – the typical case is support that comes from many projects – you maintain these in the Projects tab. Prerequisite: the administration must allow capacities to carry further projects alongside the target project. Then you list the additional projects individually in the Projects tab; their assignees may book time against the capacity.
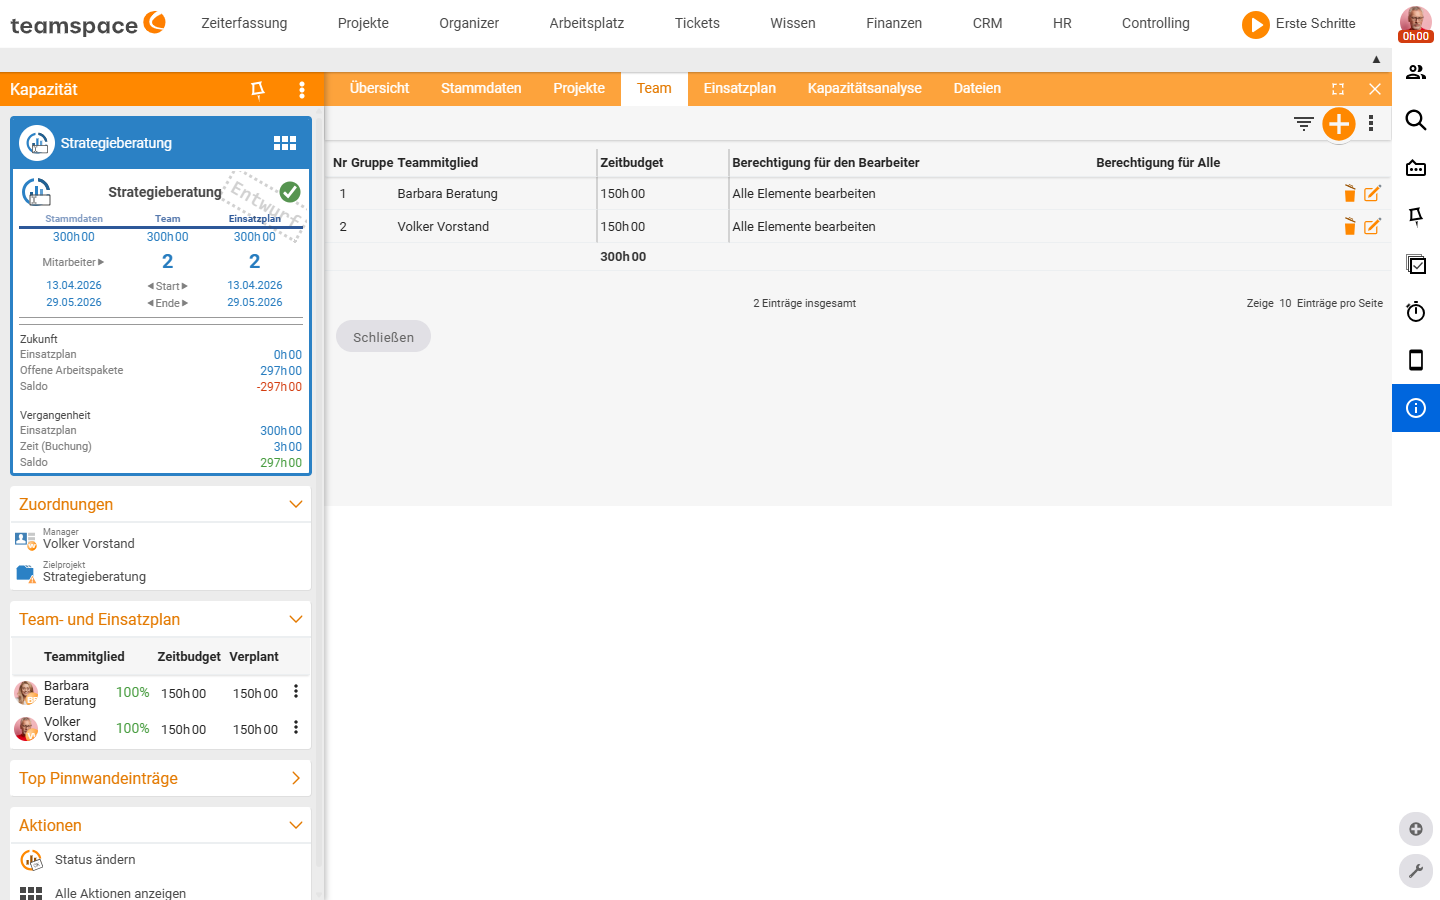
4. Staff the team
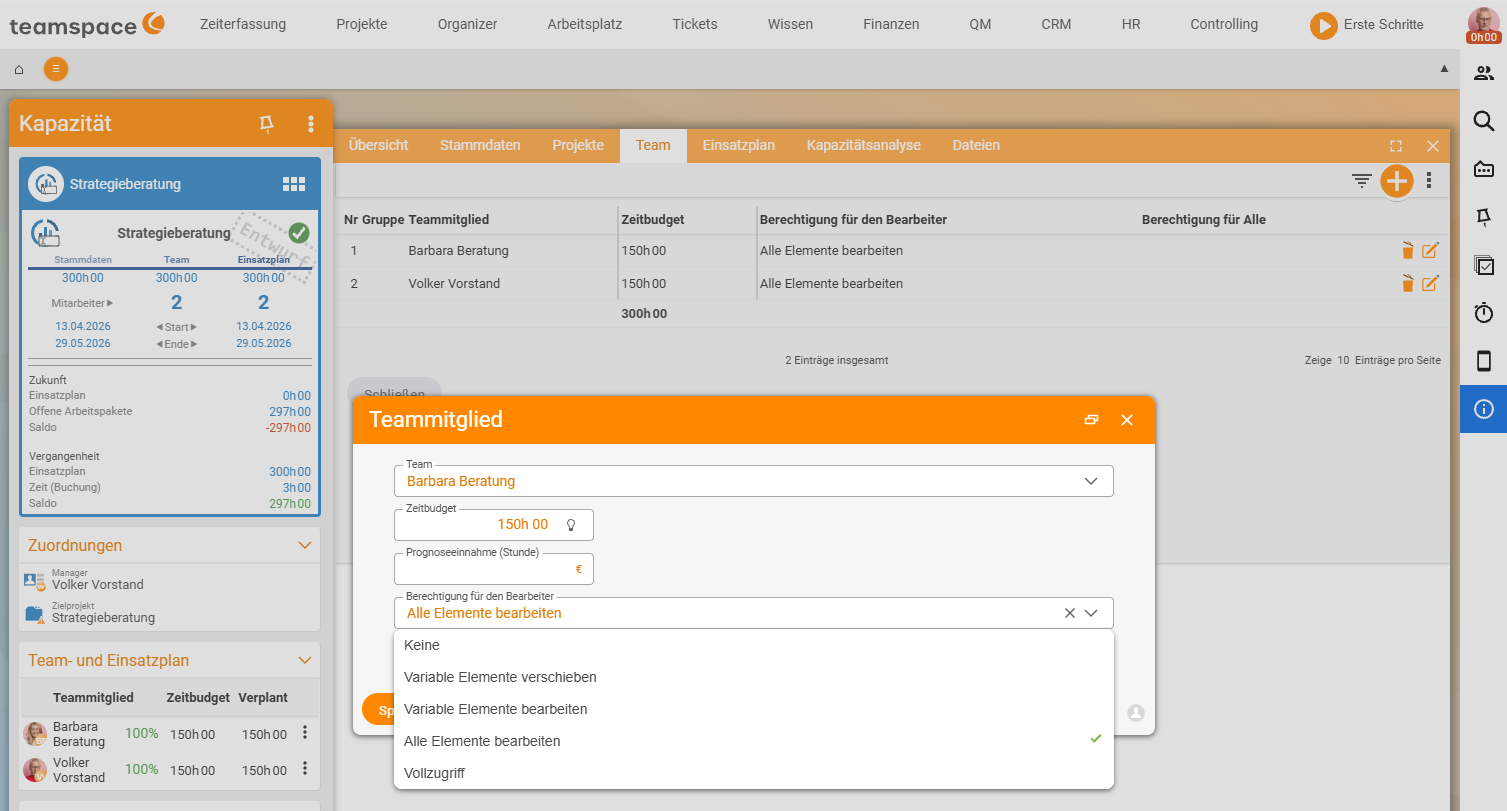
Via the Team tab you assign the employees who may be scheduled within the capacity. With the New team member action you add a member. For each person you set:
Time budget– how many hours of the capacity are allotted to this employee. The sum of all members is shown at the bottom as the Σ row – so you see at once whether the team budget fits the master-data budget.Permission for the assignee– what the employee may do with their own days: view only, move or edit.Permission for all– what they may do with their colleagues’ days. If this is set toEdit all elements, they may also move locked slots.
The time budget you have assigned is then shown in the Team and resource schedule block on the left – per employee Time budget and Scheduled as a percentage. So you can tell straight from the detail manager whether an employee is fully utilised or overloaded.
5. Govern access to the capacity
Who may see and edit the capacity at all follows in the first instance from the target project: all children of the target project inherit access automatically (see step 3). Beyond that, teamspace generally knows three access modes for elements:
Unrestricted– everyone can see and edit the element.Restricted– requires special permissions that you grant via rules (group/individual + access right).Private– only the creator has access.
You set the access mode in the Permissions tab of the capacity detail manager: by default it is Unrestricted (“All users have full access to the selected elements”). You change it via the Unrestricted, Restricted and Private actions in the sidebar. Separately from this, in the Team tab (step 4) you govern per employee, via the Permission for the assignee drop-down, what they may do with the individual plan entries.
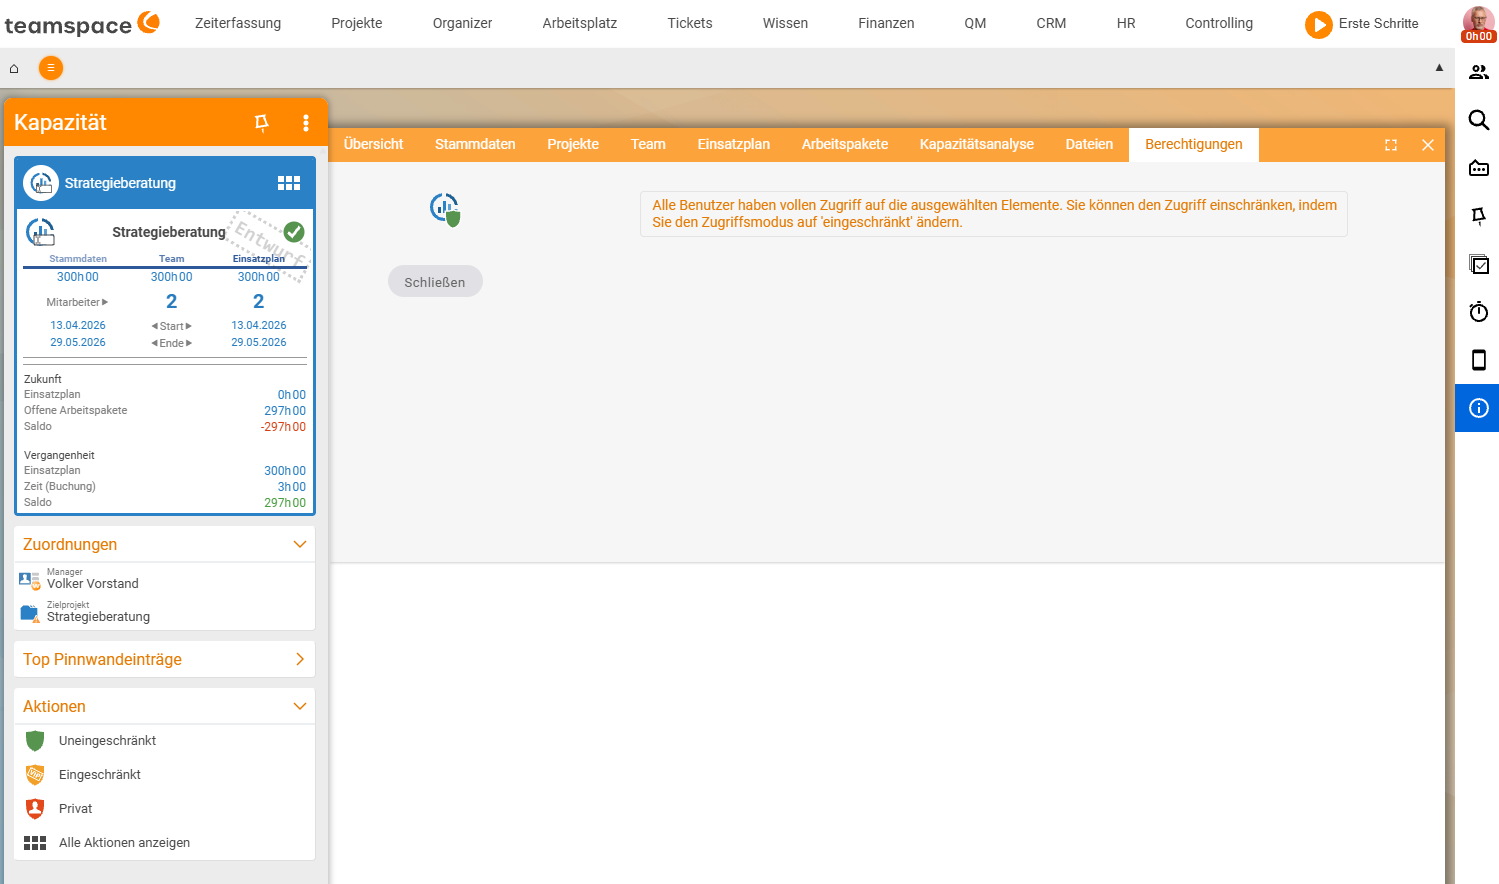
ℹ Two levels. The access mode governs who opens the capacity at all. The team permissions (step 4) govern what someone may do with the individual plan entries. The two apply independently of each other.
Attaching files
Via the Files tab you attach documents the plan needs to the capacity – briefings, effort estimates, prior agreements. Via the action box you upload a new file or link an existing one. The file logic is the same across modules – details in Topic: File management.
Forum and history
Two further areas accompany every capacity:
Forum– the place for discussions around the capacity, for example when the team talks about the distribution or has to agree on a change. Via theForumaction (orNew topic) you start a new post.- History – runs in the background and records every status change of the capacity. It becomes visible in the
Timelineon theOverviewtab, so you can trace who changed the status and when.
Common questions & needs
| You want to … | How to |
|---|---|
| Check availability for a quote | Create a capacity with Probability 50%; when the order comes in, switch it to 100% and status In progress. |
| A capacity for support from many projects | Allow further projects in the administration, then add the source projects in the Projects tab. |
| See the planned revenue | Set Forecast revenue (per hour) + Currency in the master data – the capacity analysis turns it into money. |
| Check whether the team budget fits the pot | Compare the Σ row under the Team tab with the Time budget in the master data. |
| Let an employee move only their own days | Set Permission for the assignee to “move” and Permission for all to “view”. |
| Let the capacity follow project changes | In the Target project accordion, activate the synchronisation settings for time, budget or name. |
| Make the capacity visible only to you | Choose the Private access mode. |
| Highlight a capacity visually | Set a Colour marker in the master data (list from the configuration). |
Related topics
- Maintain the resource schedule Capacity How-to
- Work with the scheduling assistant Capacity How-to
- Topic: Permissions Permissions Introduction
- Topic: File management File management Introduction