



If you work with files a lot, it pays to connect your teamspace file directory as a drive in Explorer (Windows) or Finder (Mac) via WebDAV. You then see and edit teamspace files as if on a network drive – and everything stays safely stored in teamspace: permissions still apply, and every save creates a new version automatically.
Step 1: Get the server address
- In teamspace, switch to any file directory – it doesn’t matter which; it is the starting point from which you later navigate on in Explorer. It can be the main directory or a project directory.
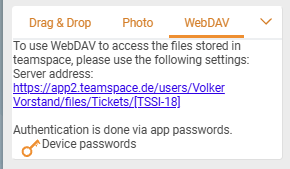
- In the Upload sidebar, open the
WebDAVtab. - Copy the
Server address:(e.g.https://<your-instance>.teamspace.de/users/<User>/files/).
Step 2: Create a device password
For signing in you use not your login password but a separate device password. There’s a reason for this: if you change computers, you can revoke the device password selectively, without changing your main password.
Avatar menu (top right) → Personal settings → Devices → New device password- Create a new device password and give it a name (e.g.
Explorer). - Save – teamspace now shows you a user name and a password. You’ll need both in a moment in the operating system’s login dialog.
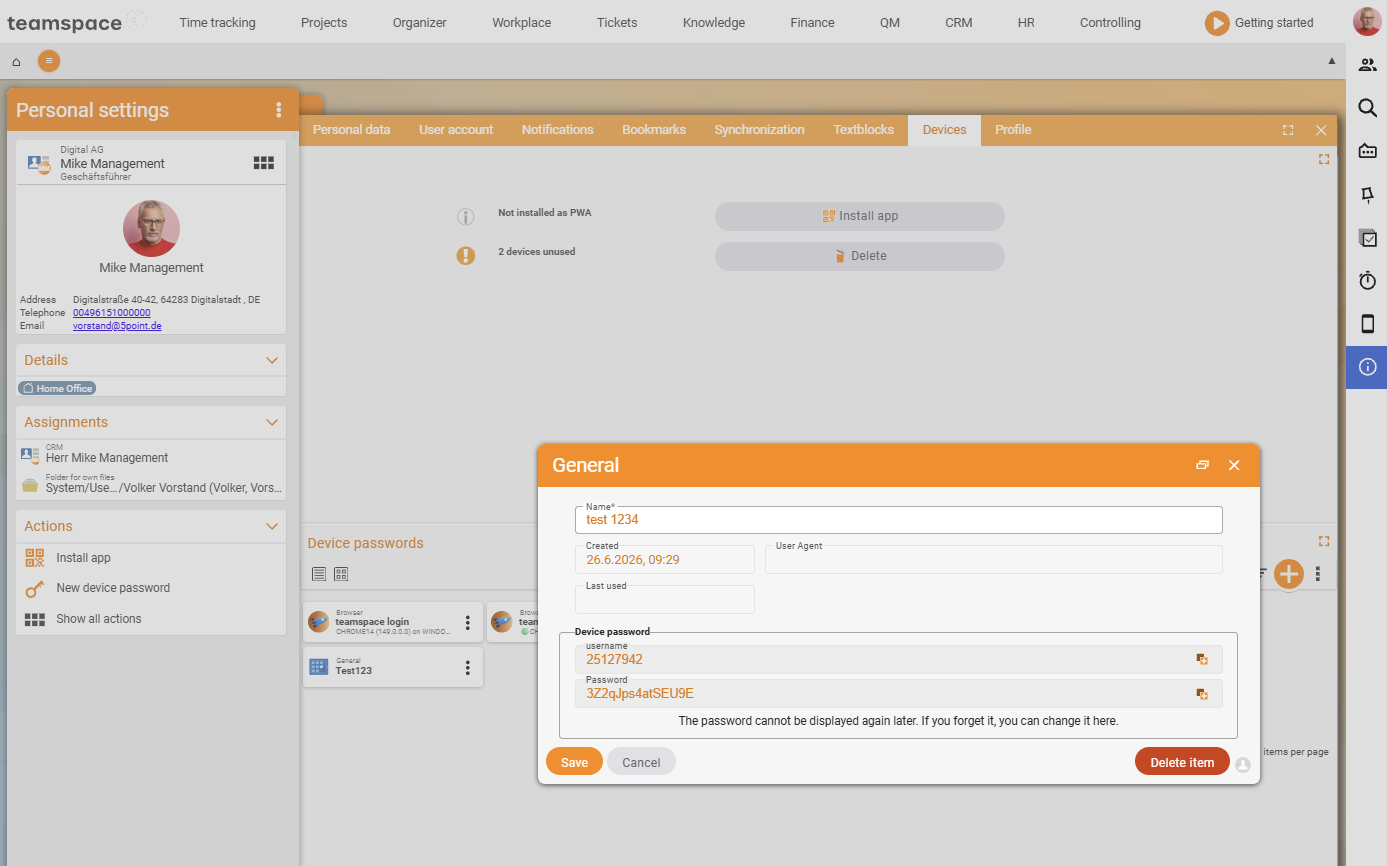
⚙ Prerequisite. Create the device password once per device – your normal login password does not work for WebDAV.
Step 3: Connect the directory in Explorer/Finder
Using the Windows Explorer as an example (Mac/Finder is analogous):
- In Explorer choose Add a network location and click Next in the wizard.
- As the internet address, paste the
Server addresscopied in step 1 and click Next. (If you remove the trailing path part, you land in the main directory.) - In the login dialog, enter the user name and password of the device password, tick “remember credentials” and confirm with OK.
- Give the connection a name (e.g.
teamspace) and click Finish.
The teamspace directory now sits as a drive in Explorer. You can drag files into it, create new folders, open, edit and save files – everything lands directly in teamspace.
ℹ Info. Permissions apply over WebDAV too: in Explorer you only see files and directories you are authorised for in teamspace. So this “back door” does not get you to locked content.
⚠ Important. In Explorer or Finder you always see only the current version. You’ll find the version history only in the detail manager under the
Versionstab – File Explorer doesn’t know about it.
Step 4: Delete the device password again
If you want to revoke the access – for instance because you’ve changed computers:
Avatar menu → Personal settings → Devices → delete the entryAfter that, no one can reach your files through the permanently created Explorer location any more.
Common problems
Why does the login in Explorer fail?
Use the device password, not your login password – the normal login does not work for WebDAV. If it still won’t work, create a new device password under Personal settings → Devices.
Why is an older version of my file missing in Explorer?
Explorer only ever shows the current version. The version history sits exclusively in the detail manager under the Versions tab.
Can I reach locked content via WebDAV? No. Permissions apply over WebDAV too: in Explorer you only see files and directories you are authorised for in teamspace.
Common questions & needs
| You want to … | How to |
|---|---|
| Save straight from Word/Excel into teamspace | Connect the directory via WebDAV and save the file from the app into the drive – teamspace creates a new version automatically. |
| Cut off access from an old computer | Delete the associated device password under Personal settings → Devices. |
| Reach an older version | Not possible in Explorer – via the detail manager, Versions tab. |
| Login fails | Check that you are using the device password (not the login password); recreate it if necessary. |
Related topics
- Upload files File management How-to
- Manage versions (with video) File management How-to
- Edit and lock files online File management How-to