
The booking-data service transfers invoices and travel expenses from teamspace/projectfacts to the DATEV cloud. To use the interface, you must first purchase and activate the feature via the DATEV shop.
Note: If you run the system in standard hosting or on your own server, please contact the support team. We will take care of activating and setting up the interface on the server side.
Prerequisites
Before you begin the setup, check the following points in teamspace or projectfacts:
- Maintained article master data and cost types: the G/L account numbers are derived from them.
- Supplier and customer account numbers: these must be present in the customer master data and in the departments.
- Department = tenant: the department (for example the contractor on an invoice) also determines the DATEV tenant for which the booking data is transferred.
- Permitted invoice numbers: observe DATEV’s guidance on permitted invoice numbers.
Next, in the configuration under Finance > DATEV, activate the booking-data service and enter your adviser number as well as the tenant number(s). For each tenant number you can additionally enter the start of the financial year (FY). (You will find the numbers in your DATEV access, on documents from DATEV, or you receive them from your tax adviser.)
Select a start date from which documents are to be transferred. This ensures that the system does not offer you any older documents that have already been transferred or exported elsewhere.
The user account for the data transfer needs finance clerk rights as well as the “DATEV Datenservice” permission for the menu items under which the booking-data service is located.
Two tiles are important: “Documents to export” and “Posting batch”. If these menu items are missing from the main menu, they can also be created directly from a user group.

Posting batch
A posting batch contains all invoices and travel expenses of a particular period for one DATEV tenant. Note that no documents from different financial years or from different tenants may be contained in one posting batch.
To create a new posting batch, first make sure that the connection to DATEV is established. For a posting batch, the period to be transferred is defined. The customer master data and booking data are always sent to DATEV. Document images (such as PDFs or scans), however, are optional.
A new posting batch automatically collects all relevant documents and costs of the specified period. To begin with, it is in the draft stage.
When the connection to DATEV exists, you can start the transfer in the detail manager of the posting batch. Depending on the volume, the transfer and the subsequent processing by DATEV can take a while. You receive a menu notification as soon as processing by DATEV is complete.
Booking data
The booking data originates from the Invoicing and Costs modules. From Invoicing these are the document types invoice, invoice correction, cancellation as well as incoming invoice.
With Costs, there is the possibility that they stand on their own or are part of an expense invoice. Expense invoices can be a travel expense report or also a collective, weekly or monthly statement. Costs that are part of a statement are treated like invoice line items: document image and document number are derived from the statement.
Setup step by step
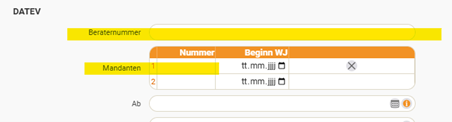
1. Enter the adviser and tenant numbers
The tenant number and the adviser number must be entered in the configuration under Finance → Settings in the DATEV tab.
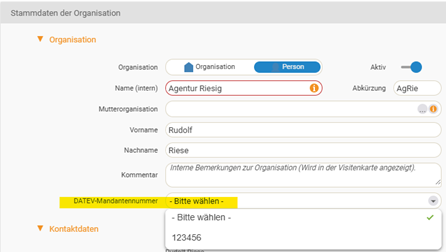
2. Assign the tenant number to the organisation
The tenant number must then be selected in your organisation – this is the client on outgoing invoices, or the contractor on incoming invoices.
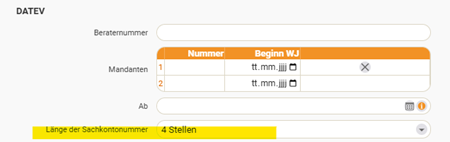
3. Set the length of the G/L account number
The length of the G/L account number must be set correctly.
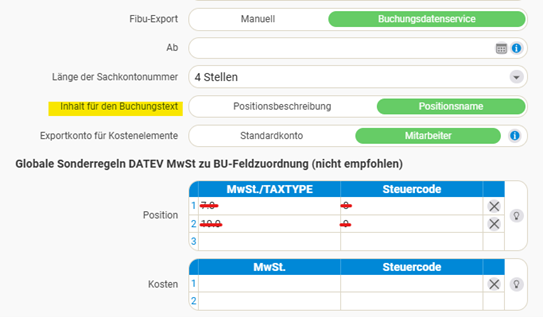
4. Set the interface to “Buchungsdatenservice”
In the configuration, set the button to “Buchungsdatenservice”.

5. Posting text and special rules
Content for the posting text: which data should be transferred to DATEV? Your tax adviser decides which information is needed. In most cases it makes sense to use the “Item name”.
Note: The posting text is limited to 60 characters on the DATEV side.
If entries exist in the “Global special rules DATEV VAT to BU field assignment (not recommended)” tab, please remove them. Instead, you can store posting keys in the article under “Tax codes of the finance article” if you wish.
6. Tiles and document images
Two tiles in the system are important: “Documents to export” and “Posting batch”. In the permissions, the “DATEV Datenservice” field must be activated so that the tiles are visible.
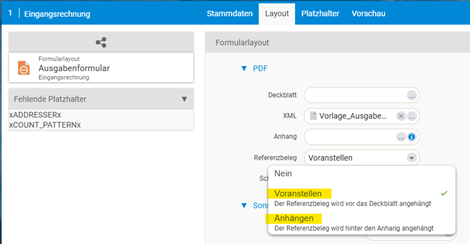
The “Incoming invoice” and “Collective statement” layouts require, in the “Layout” tab in the “Reference document” field, the setting “Prepend” or “Append” – you decide which you prefer.
In general, the point is for the tax adviser to receive the document images that are decisive for tax purposes. For all documents and costs where users upload their own images, these must be incorporated into the generated PDF, since only the generated PDF is ever transmitted to DATEV.
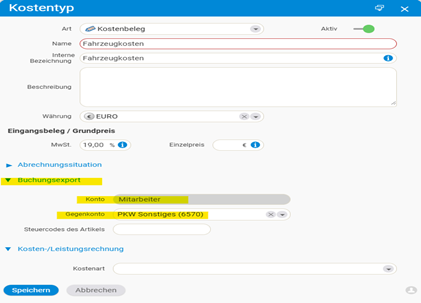
7. Configure accounts and cost types
Accounts must be configured in the Finance area – according to the tax adviser’s specifications. The articles in the system require an account assignment. There are two options:
- Each article receives its own account assignment.
- Two accounts are distinguished in the system:
- Expense account for purchasing articles
- Revenue account for sales articles
If cost elements or travel expense/employee payroll statements are to be transferred, the cost types must have a default account and a contra account.
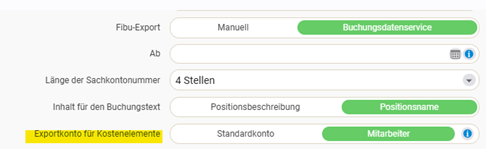
8. Employee payroll statements
For employee payroll statements, note that employees must have a supplier account number. The corresponding field may first need to be activated in the configuration under Users & Rights → Settings. In addition, under Finance → Settings in the DATEV tab, the “Export account for cost elements” must be set to Employee.
9. Customer and supplier account numbers
Customer and supplier account numbers must be stored in the customer profiles. The chart of accounts must be observed; consultation with the tax adviser is required. If no specifications exist:
- Customers (accounts receivable): 10001 to 69999
- Suppliers (accounts payable): 70000 to 99999

10. Test run of the posting batch
- Important: disable the “Lock” option in the dialog.
- Then the test run can be started on the left-hand side.
- If everything is correct, the ZIP file contains a folder with document images (PDFs) as well as two Excel spreadsheets with the booking-relevant information.
Notes
- Never mix documents from different financial years or from different tenants in one posting batch.
- Only ever the generated PDF is transmitted to DATEV – manually uploaded document images must be incorporated into this PDF via the reference document setting.
- The posting text is limited to 60 characters.
- Coordinate the chart of accounts, posting keys and document-image requirements with your tax adviser in advance.
- Use the test run (with locking disabled) before you transfer a posting batch to DATEV in a binding manner.
Common questions & needs
| You want to … | How to |
|---|---|
| Use the interface for the first time | Purchase/activate the booking-data service via the DATEV shop and activate it under Finance > DATEV with the adviser and tenant numbers. |
| Define which DATEV tenant is posted to | Via the department – it determines the tenant (client on outgoing, contractor on incoming invoices). |
| Show the tiles “Documents to export” and “Posting batch” | Activate the “DATEV Datenservice” field in the permissions, or create the menu items from the user group. |
| Transfer employee payroll statements | Give employees a supplier account number (activate the field under Users & Rights if needed) and set the “Export account for cost elements” to Employee. |
| Adjust the posting text | In the DATEV tab, choose the content – usually the “Item name” (max. 60 characters). |
| Check before transferring | Start a test run (disable “Lock”) – the ZIP contains PDFs and two Excel spreadsheets. |
Related topics
- Set up the online banking interface Configuration Configuration
- Configuration – introduction Configuration Introduction