
To receive mail in the system and send mail out of the system, you connect the desired mailboxes via the configuration. You find the relevant settings under Configuration > Tickets > Mail Accounts.
Create new mailboxes
Use the plus button to add a new mailbox. First you make the general settings and give the mailbox a name and a description.
Then choose the type of mailbox. As the vast majority of customers use mailboxes in combination with the ticketing system, “Ticket” is the correct setting. Via the “Assignment” field you choose the appropriate ticket channel in which the incoming and outgoing mail of the mailbox is to be bundled.
For an entry to be selectable, you may first have to create ticket channels. You set these up under the “Ticket channels” menu item within the configuration.
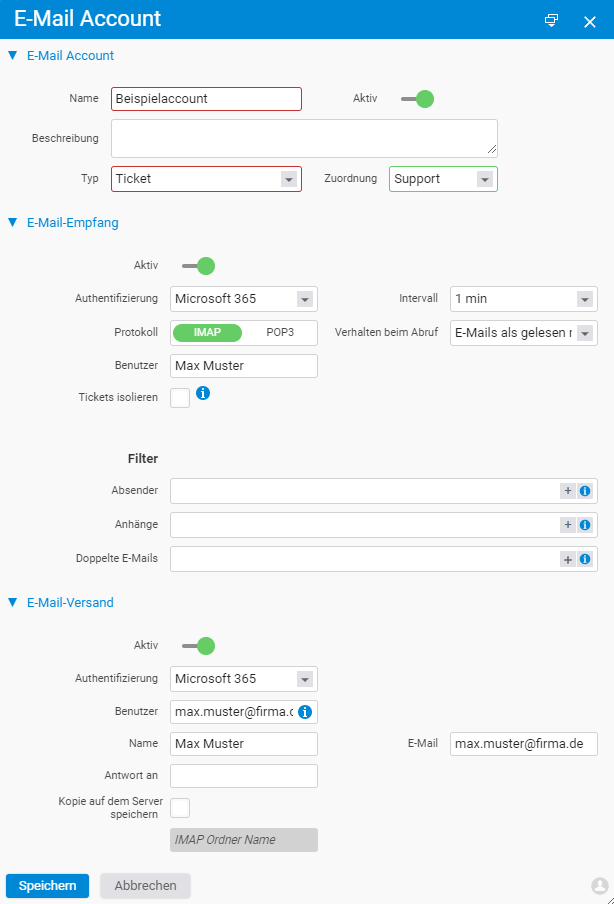
Set up incoming and outgoing mail
You activate both incoming and outgoing mail separately per account. The further setup depends on the authentication method. To use Microsoft 365 mail accounts, you change the entry under Authentication to “Microsoft 365”. You will find more information on signing in for the first time further down in the “Mail accounts with Microsoft 365” section.
Apply the settings of your mail account regarding:
- Security: STARTTLS or SSL
- Protocol: IMAP or POP3
- Credentials
You will find more information on this from your mail provider. Optionally, you can set up filters for senders and attachments, define ports and set the polling interval.
Setting up outgoing mail works in the same way as incoming. Here too, mind the section on Microsoft 365 mail accounts if applicable. Besides the URL and credentials, you can store a different “Reply to” address and define whether a copy of the mail is to be saved on the server.
Mail accounts with Microsoft 365
If you want to connect a Microsoft 365 mail account, you proceed as described above and set the authentication for incoming and outgoing mail to “Microsoft 365”.
After saving, a Microsoft sign-in button appears, via which you have to sign in once and for the first time. For this, you may need to involve a contact with administration rights for your Microsoft account.
Note: Due to changes on Microsoft’s side, additional settings in your Microsoft account have been required for some time in order to be able to use Modern Auth, in particular enabling SMTP AUTH. SMTP authentication uses an OAuth token (in SASL XOAUTH2 format). For Microsoft, however, SMTP AUTH is a “legacy” authentication and is therefore disabled by default.
Enable SMTP AUTH in the Microsoft Admin Center
You may also need to disable the security defaults. It can take 30–60 minutes for the change to take effect.
If you would rather connect Microsoft 365 via your own app, the article Your own Microsoft app registration will help you.
Test incoming and outgoing mail
Once you have made all the settings, you can test incoming and outgoing mail for your mailboxes. To do so, navigate to the overview of your mail accounts (Configuration > Tickets > Mail Accounts) and click the Test button at the end of the row. After a few seconds you will receive a report. If both incoming and outgoing mail show status OK, the mailbox is correctly connected.
Notes
- “Ticket” is the appropriate type for mailboxes that work with the ticketing system – the standard case.
- Incoming and outgoing mail are activated and configured separately per account; you can also use only one of the two directions.
- For Microsoft 365, signing in via the Microsoft button is required once. When making changes to SMTP AUTH or the security settings, allow 30–60 minutes of waiting time.
- If you have questions or run into difficulties with the connection, the consulting team will be glad to help.
Common questions & needs
| You want to … | How to |
|---|---|
| Create a mailbox for the ticketing system | Use the plus button to create a new mailbox with type “Ticket” and assign it to a ticket channel. |
| The ticket channel is not selectable | First create a channel under “Ticket channels” in the configuration, then assign it in the mailbox. |
| Receive mail only, but not send | Incoming and outgoing mail are activated separately – just switch on incoming mail. |
| Connect a Microsoft 365 mailbox | Set the authentication for incoming and outgoing mail to “Microsoft 365” and, after saving, use the Microsoft sign-in button. |
| Connect Microsoft 365 via your own app | Follow the article Your own Microsoft app registration. |
| Check whether the mailbox is correctly connected | Click the Test button on the row in the overview; incoming and outgoing mail must show status OK. |
Related topics
- Your own Microsoft app registration Configuration Configuration
- Set up single sign-on (SSO) Configuration Configuration