
On the ticket you document every action as an activity — a reply to the customer, an internal note, a status change, a solution. Alongside that you log time, create documents from the ticket, attach it to a project, merge several tickets or split an activity off into its own ticket. It all takes place in the detail manager.
Activities — how the communication runs
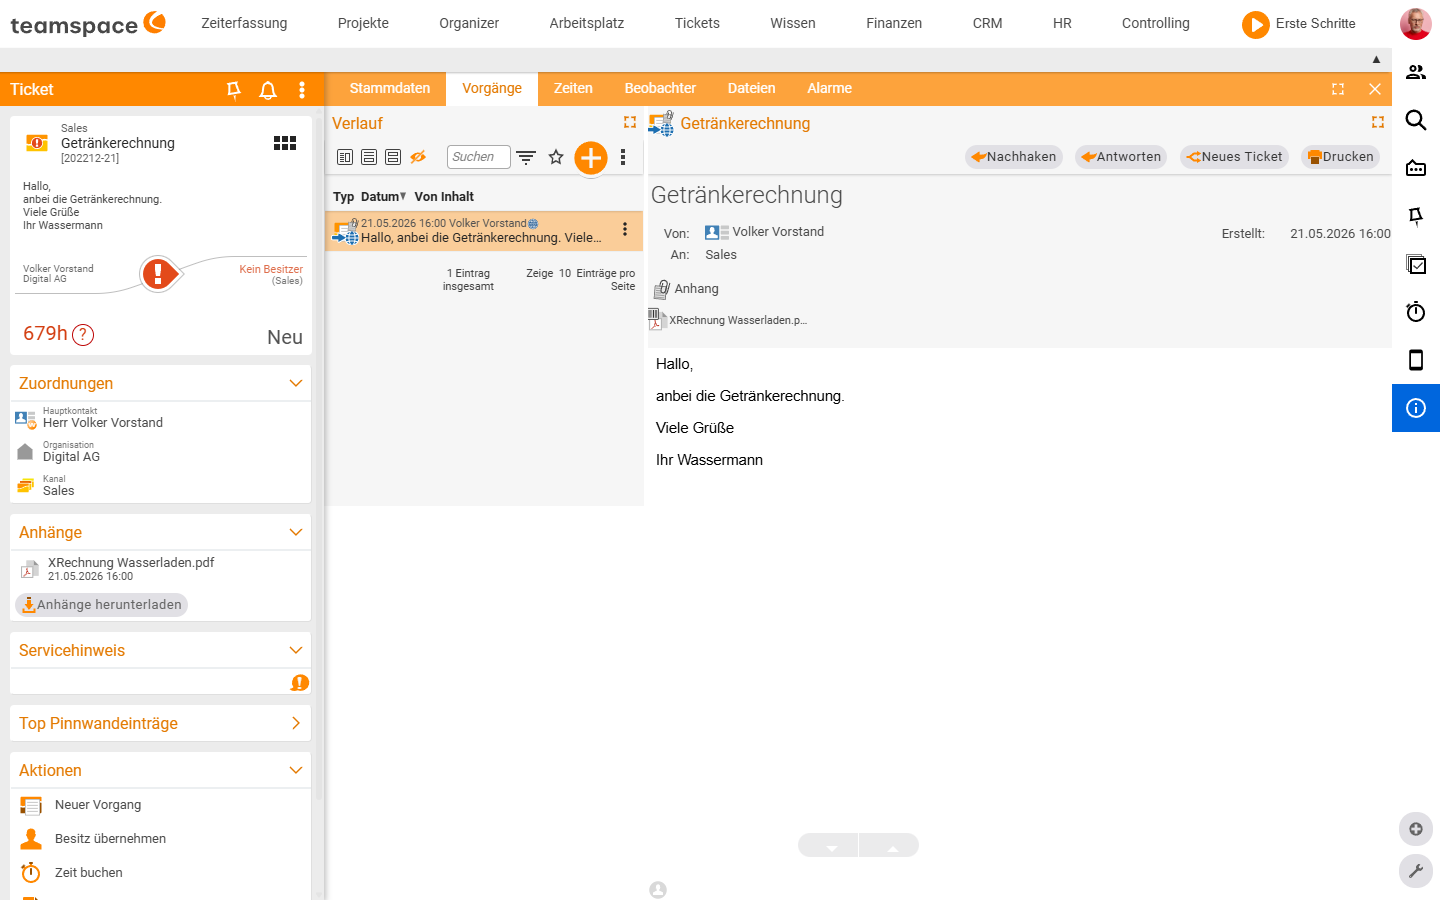
Every action on the ticket is recorded as an activity in the Activities tab — chronologically, with type, date, sender and content. Four activity types are available:
Incoming: an email or a call that comes in. For email tickets the incoming activity is created automatically; for calls you document it manually.Outgoing: your reply to the customer, your dispatch of an email or a letter.Status change: the default choice when you change status, channel or owner and want to record it in the history. You can add a note giving the reason.Note: a free-text entry that is neither incoming nor outgoing communication — an internal remark to colleagues, a note to yourself.
You create the activity via the blue plus button in the history toolbar. A click opens the selection menu with New activity and Take ownership.
Responding to email tickets
For an email ticket the important actions sit at the top right of the Activities tab:
Follow up: you sent the last email yourself and want to chase it up. Opens a dialog with the email history; you write the next email.Reply: the last email came from the customer, you reply. Opens the reply dialog with theSubjectasRE: <original subject> [<ticket number>]. The toggleShow in external accessis active by default.New ticket: when an activity is a new topic and deserves its own ticket — for example because the customer raises two unrelated requests in one email. The selected activity is split off into a new ticket.Print: the activity or the whole ticket is output in print form.
ℹ Info: If the customer replies once more after a successful closure, the ticket is automatically reopened by its ticket ID. You don’t have to fetch it from the archive.
Documenting internal activities
Via New activity you create an internal activity — even without sending an email. The dialog has four sections:
① Type*: activity type and visibility. The toggle pairShow in external access/Show internally onlydecides whether the activity appears in the external access for customers.Activity: an HTML editor for the content plus a field for attachments.Next status of the ticket*: chips for status, channel and owner. A click on a chip changes the value.Assignments of the ticket: chips for main contact, organisation and channel.
The footer buttons: Save, Save draft, Cancel, plus a red Delete draft on the right. You use an internal activity when you want to clarify something within the team — a colleague receives a notification and can create a follow-up activity themselves.
Attaching a note
If you want to save a plain note without a status change, choose the type Note in the activity dialog and write the text. The note stays in the history, is filterable, and via Show in external access it can be made visible to customers or kept internal only.
Solution path
For recurring problems you can define a standard solution method — in the configuration under Tickets → Settings → Solution path. As soon as the method is set up, it appears on the ticket above the history as its own block.
When you work on the solution, a new ticket activity is automatically created — you can see afterwards who worked on the solution path and when. On the next call-up, the previous state is copied and you carry on step by step. This produces a seamless record of how the problem was resolved — useful for similar tickets later. The Solution path is its own block on the ticket, not an activity type — the activity types remain Incoming, Outgoing, Status change and Note.
Visibility per activity
Via the toggle pair in the ① Type* section you define whether an activity is visible in the external access — for outgoing emails Show in external access, for a Status change the pair is called Document activity / Show internally only. In addition there is the action Hide activity in the three-dots menu of the history row — the activity then also disappears from the internal display (it can be brought back via Hide hidden activities). How the external access works is described in Visibility & access.
Changing owner, responsible person and status
In the activity dialog under Next status of the ticket* you see the current owner, responsible person and status as a chip. A click on a chip changes the respective value — the new owner receives a notification on saving.
Which statuses are allowed is controlled by the workflow on the channel: the standard workflow has New, In progress, Answered, Successfully closed, Unsuccessfully closed. An admin sets up custom statuses and workflows — see Ticket statuses & workflows. The difference between owner and responsible person and when they are filled automatically is covered in Visibility & access.
Logging time to the ticket
Times are generally logged to projects. If the ticket is linked to a project, you log the working time directly from the ticket — the time lands on the project and is at the same time visible on the ticket. A default project per customer, onto which all that customer’s tickets run automatically, is a sensible setup (see the topic CRM). When replying or changing status, the time can be recorded automatically — you activate the option in the configuration. How logged time becomes an invoice is covered in Record service time & bill tickets.
Creating a document from the ticket
You can create a document directly from a ticket — a quote, an order confirmation, an invoice. First you choose the document type, then you create the document; the contact from the ticket is carried over automatically as the recipient. More on document types in the topic Invoicing.
Creating a ticket project
Sometimes one ticket is not enough — the matter becomes a project with its own times, finances and progress. Via the action Create ticket project you create a project from the ticket. The dialog Project first asks for the Creation option:
New projectcreates a standalone project,Project extensionattaches the ticket to an existing project.- For
Project extensionyou choose the parent project in the fieldfrom, and underTicket aswhether the ticket becomes aSubproject,Work packageorProject template. - With
Nextthe master-data dialog opens, pre-filled with the data from the ticket —Savecreates the project.
Once ticket and project are linked, the ticket preview and project preview change — both show the link. You adjust the assigned project later in the master data. More on project mechanics in the topic Project management.

Merging tickets
If a customer sends several tickets about the same matter, you bundle them into one via the action Merge — all activities run into the main ticket, the other tickets are automatically closed and can no longer be edited. Further communication runs only through the merged ticket. The action sits in the three-dots menu of the ticket (Show all actions) or in the multiple selection of the list.
Splitting an activity off into its own ticket
If an activity has landed in the wrong ticket by content or deserves its own ticket — for example because the customer raises two unrelated matters in one email — you split it off via the action New ticket. The selected activity moves into a new, standalone ticket. You find the action at the top right of the Activities tab and in the three-dots menu of the history row.
The three-dots menu of a history row carries, depending on the activity type, Edit, Follow up or Reply, New ticket and Print as well as Hide activity, Contact relevance, Log time, Start stopwatch and Mark as draft. A dedicated action to “move activity” or “copy activity” into an already existing ticket does not exist in this edition (verified live 2026-06-25) — the reverse way, merging several tickets into one, runs via Merge (see above).
When a ticket stalls
Escalations and service level agreements automate what happens when a ticket sits too long — the owner is released, the channel switches, a warning goes out. An admin sets up both mechanisms: Set up SLAs & escalations.
Common questions & needs
| You want to … | How to |
|---|---|
| Reply to the customer | Reply (customer wrote last) or Follow up (you wrote last) at the top right of the Activities tab. |
| Record an internal remark | New activity → type Note, Show internally only. |
| Set the status to “Answered” | Click the status chip under Next status of the ticket* in the activity dialog. |
| Hand the ticket to a colleague | Change the owner chip in the activity dialog to the colleague. |
| Separate two matters from one email | Action New ticket on the activity — the activity is split off. |
| Bill the effort | Log it in the Times tab; continue in Bill tickets. |
| Run a large matter as a project | Action Create ticket project. |
| Bundle several tickets on the same topic | Action Merge tickets. |
| Reuse a standard solution | Define the Solution path in the configuration, work on it iteratively on the ticket. |
Related topics
- Create tickets Ticketing How-to
- Record service time & bill tickets Ticketing How-to
- Visibility & access (with video) Ticketing Concept
- Ticket projects