
The Next steps module gives you the option of having follow-up tasks that are tied to a document created automatically. Examples:
- Create an open item “Follow up” when validating quotes.
- Automatically send an email asking for customer feedback when validating invoices.
- Create a to-do “Plan project” when creating an order confirmation.
- Call a webhook, e.g. to address an API.
You can trigger these and similar processes automatically in connection with documents. Below we show you how to go about it.
Enabling Next steps
If you have at least the teamspace Enterprise edition, you can set up the module in the user groups. To do so, you need to activate a few rights:
- the permissions to view, edit and delete Next steps,
- optionally, enabling the module in the document detail manager as a separate tab,
- the configuration right to be able to create templates – there you will find the corresponding tile.
If you have questions about the permissions, please feel free to contact our consulting team.
Creating templates for Next steps
Under Configuration > General you will find the “Next steps” tile. There you create templates and view them. Use the plus icon to add a new template.
In the creation dialog, you first choose the type of Next step. The current options are:
- Ticket – creation of a ticket from a ticket template.
- URL – calling a particular web address, primarily for webhooks.
- Open item – creation of an open item, e.g. a to-do.
- Comment – documentation in the form of a short text message.
The dialog changes depending on your selection. In the example, we opt for an Open item. Optionally, you restrict the user group for which the Next step is available, and set up a grouping. This is advisable above all when you have very many templates, to make them easier to find again.
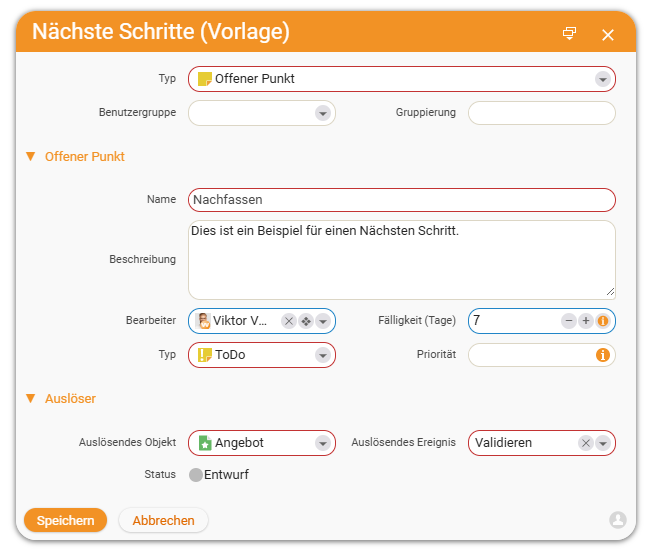
Name the open item, enter a description and, if you wish, directly choose an owner to whom the open item is handed over on creation. As is usual with open items, you can choose between various types such as “ToDo”, “Idea” or “Note”. If you store a due date, it applies automatically from the creation of the open item.
In the Trigger section, you set the rule for the circumstances under which the open item should be created. For the triggering object, you enter the type of the desired document, e.g. quote. Right next to it, you define the triggering event. The options are:
- Manual – you create the open item by hand; it is merely pre-filled so that it is available with a single click.
- Creation – the Next step is executed automatically when the document is created.
- Validation – the Next step is executed automatically when the document is validated.
Linking Next steps with documents
You then link your Next-step templates with a specific document or a document template. To do so, open a document or a document template and switch to the “Next steps” tab. If you cannot see the tab, you probably lack the appropriate right in the user group.
Use the plus button to create a Next step. Here you either create a completely new step or fall back on your template – you will find it in the dropdown menu under “Target”. If you select the template, you will see all the entries again and can adjust them if necessary. Once you are satisfied, simply save the Next step.
The function is particularly handy in connection with a document template: the Next step is then a) automatically entered into every document created from the template, and b) automatically created as soon as the trigger has come into effect.
Viewing and completing Next steps
You find the Next steps for a particular document in the document under the “Next steps” tab. If a Next step has been created but not yet triggered, it is still greyed out in the list and is in the status “Waiting” when you click on it.
As soon as the triggering event has taken place – in the example the validation of the document – the Next step is created. The open item is now visible in the list and the Next step changes to the status “Open”. If a specific owner was entered, they now receive a notification.

The owner of the open item can see and edit it. Once the to-do is done, they mark this directly in the open item. The handler of the document then also sees that the open item has been completed.
Notes
- The module requires at least teamspace Enterprise.
- You only see the “Next steps” tab on the document with the appropriate user group permission.
- You can only create templates with the configuration right (tile under Configuration > General).
- With a manual trigger, the Next step is only pre-filled – it is executed only on a click.
- Next steps linked to a document template are automatically transferred into all documents created from it.
Common questions & needs
| You want to … | How to |
|---|---|
| Follow up automatically when validating a quote | Create a template of the type Open item, choose “Quote” as the triggering object and “Validation” as the event. |
| Trigger an external API | Create a template of the type URL and store the web address of the webhook. |
| Transfer the follow-up task into every document of a template | Link the Next step to the document template instead of the individual document. |
| Show the “Next steps” tab | In the user group, enable the right for Next steps and, if necessary, the tab in the document detail manager. |
| Assign the open item to a particular person | Enter an owner in the template – they receive a notification on creation. |
| Trigger the step on demand rather than automatically | Choose “Manual” as the triggering event; the Next step is then only pre-filled. |
Related topics
- Create custom fields Configuration Configuration
- Configuration – Introduction Configuration Introduction