


With our Outlook add-in your email management becomes even easier. If you are a licence customer of 5 POINT AG, you can link Microsoft Outlook comfortably with projectfacts or teamspace. That way you export your emails straight into the ticketing system and keep an eye on the processing status of your tickets right in your Outlook inbox.
The requirements are:
- A projectfacts or teamspace account
- A Microsoft 365 account
Available on the platforms:
- Outlook on Windows (Microsoft 365)
- Outlook on Mac (Microsoft 365)
- Outlook on the web
Upgrading from the projectfacts to the teamspace add-in
The teamspace add-in works with both a projectfacts and a teamspace host system. Since Microsoft is switching off some functions of the projectfacts add-in soon, it is best to move over to the teamspace add-in. To make the switch go smoothly, proceed like this:
- First you should remove all stored user data of the projectfacts add-in from your browser. To do so, simply open the add-in’s settings dialog and click “Sign out” twice.
- After that you can uninstall the projectfacts add-in and add the teamspace add-in directly through AppSource in Outlook.
- Finally you only need to sign in to the teamspace add-in. That works either with your teamspace or projectfacts credentials or – if you use two-factor authentication – with a device password.
No worries: all tickets you previously imported through the projectfacts add-in are retained.
It is worth knowing that the teamspace add-in can display information about tickets that were already imported through the projectfacts add-in just as well. So you lose neither tickets nor information in your Outlook when switching.
teamspace Outlook add-in
Installing the add-in
You find the teamspace add-in easily through Microsoft AppSource and can install it from there. Depending on the platform, the installation runs slightly differently.
If you use Outlook on Windows, you simply click “Get Add-ins” (3), type “teamspace” into the search and select the application. Then just click “Add” – and the add-in is installed in your Outlook inbox.
After the installation you can start teamspace directly via the highlighted tile (4).

If you use Outlook on the web, you can open AppSource just as easily: select a message and click the highlighted button (2) in the message header.
The installation works exactly as on the Windows client – after adding it, the teamspace logo (1) appears in the header. If it is not visible right away, a page reload or a click on the context menu (the three dots in the header) usually helps. After that everything should work smoothly.

Update: the icon and the function of the “Get Add-ins” button have changed. Look out for the new icon to install add-ins such as the teamspace add-in. If you do not find it right away, just look in the menu – it should be easy to spot there.

The first time you start the add-in, a dialog for authentication opens. If that does not happen automatically, you can call the dialog up manually at any time via the button in the footer bar (6).
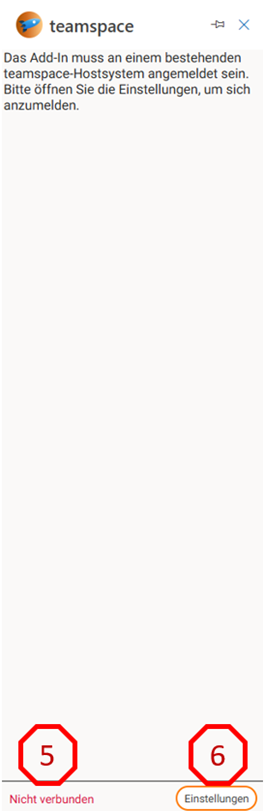
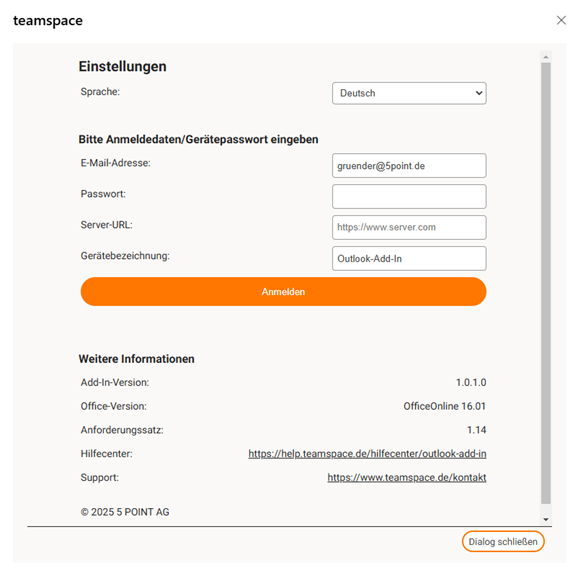
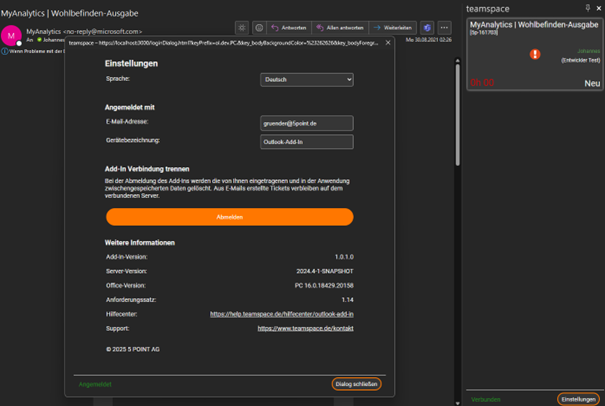
In the dialog you can not only set the language and connect the application to your teamspace server, but also contact support or sign out again later.
To link the add-in with your teamspace system, simply enter your teamspace credentials into the fields “Email address”, “Password” and “URL”. If you like, you can set a name for your Outlook instance in the “Device label” field – that way you keep the overview.
With a click on “Sign in” your data is transmitted and you receive an authentication token for the secure communication with the teamspace host system. Once that is done, the dialog disappears and the add-in is ready for use!
Interface and functions of the add-in
After you have signed the application in, the work area changes automatically. Options for creating a ticket are then available to you there. If a ticket already exists in your host system for the selected message, the corresponding ticket information is displayed.
The application always checks whether the selected message has already been exported to the ticketing system. If so, it loads details about the ticket, the latest activity and the relevant contacts. This information is then displayed in the work area. If no ticket exists for the message yet, you can either create a new ticket in the work area or add the message to an existing ticket.
In the footer bar you find a button for the settings (6), an indicator for activities (for example when transferring a message) and the connection status of the application (5). When you move from one email to the next, Outlook may not take you directly to the message, but to other aspects such as the “meeting details” of a meeting invitation. Only once you are in the “Message” tab does the selected message get updated in the add-in. You can also recognise this by the message “Item changed” in the footer bar (5).
The interface colour of the teamspace add-in adapts automatically to the Office theme on the Windows client. In the web version of Office the colours depend on the system scheme.
When creating a ticket, the add-in exports the following data:
- The title of the message
- The first recipient email address
- The sender email address
- CC & BCC (for outgoing emails)
- Information on whether the message is incoming or outgoing
- The content of the message
- The attachments of the message
- The message ID of the message
- The selected ticket channel
- The selected status
- The selected owner, or whether an owner should be set at all
This ensures that all important information for the ticket is captured and processed automatically.
Creating a ticket
With the first selector (7) you can decide whether a new ticket is created from the email or whether the email is matched to an existing ticket as a new activity. If tickets already exist in the teamspace system, they are shown there.
With the last option you can refresh the selector quickly – for example when you only picked the right ticket in the host system after reading through the email. That way everything stays up to date.
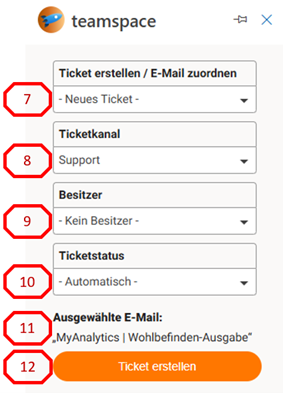
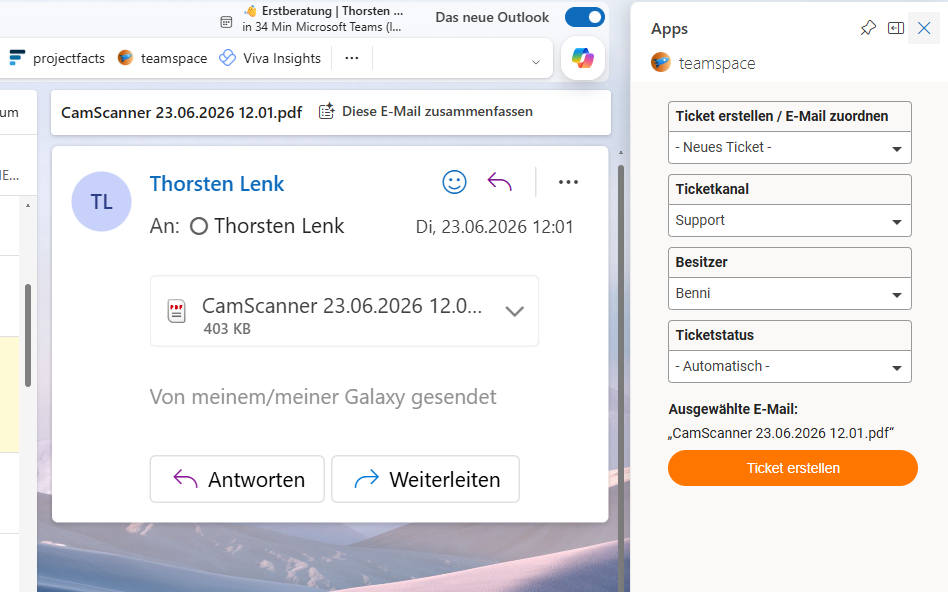
In the selector for the ticket channel (8) you can define in which channel the new ticket should be created.
Afterwards you can select a ticket owner (9) depending on the channel. If the ticket should not be assigned to a particular owner, simply pick the first option.
In the selector for the ticket status (10) you define which status the ticket should have. You can choose from the status options available in the ticket channel. The status indicates as early as ticket creation whether it only serves documentation purposes or actually needs to be worked on. If you select “Automatic”, the first status of the regular channel workflow is set.
In the field “Selected message” (11) you can check, before creating the ticket, which message you are going to transfer to the teamspace host system. As soon as you click the button “Create ticket/match email” (12), the message is sent to the teamspace system. Please make sure that the “Selected email” really is the message you want to transfer!
When creating a ticket, the add-in exports the following data:
- The title of the message
- The first recipient email address of the message
- The sender email address
- CC & BCC (for outgoing emails)
- Information on whether the message is incoming or outgoing
- The content of the message
- The attachments of the message
- The message ID of the message
- The selected ticket channel
- The selected status
- The selected owner, or whether an owner should be set at all
Details on inline attachments:
A practical feature of the add-in is the transfer of attachments that were embedded directly in the content of the message. The aim of this feature is that the content of the message looks exactly the same in the teamspace system as in your Outlook inbox. For that to work, the resource paths in the content of the message are adjusted before the transfer to teamspace.
For this feature to work, Nested App Authentication (NAA) is required. This authentication enables the communication with the Microsoft Graph API. Detailed metadata about the emails is then retrieved via Graph, which the host application needs in order to replace the inline resources correctly.
Behaviour in case of an error:
Ticket creation can be slowed down or even aborted by various factors, such as internet outages. While the add-in creates a ticket in the teamspace system, you can see the status of the transfer in the footer bar of the work area. If the transfer fails, an additional error message is shown in the work area.
Our recommendation in case of an error: check the connection to the teamspace host system and look in the ticket overview to see whether the ticket has already been created. It may be that the ticket was created but the attachments have not been transferred yet or only partially. If the ticket has not been created completely, we recommend deleting it and creating it again.
If tickets still are not created correctly despite these steps, please contact our support.
Navigating to the ticket
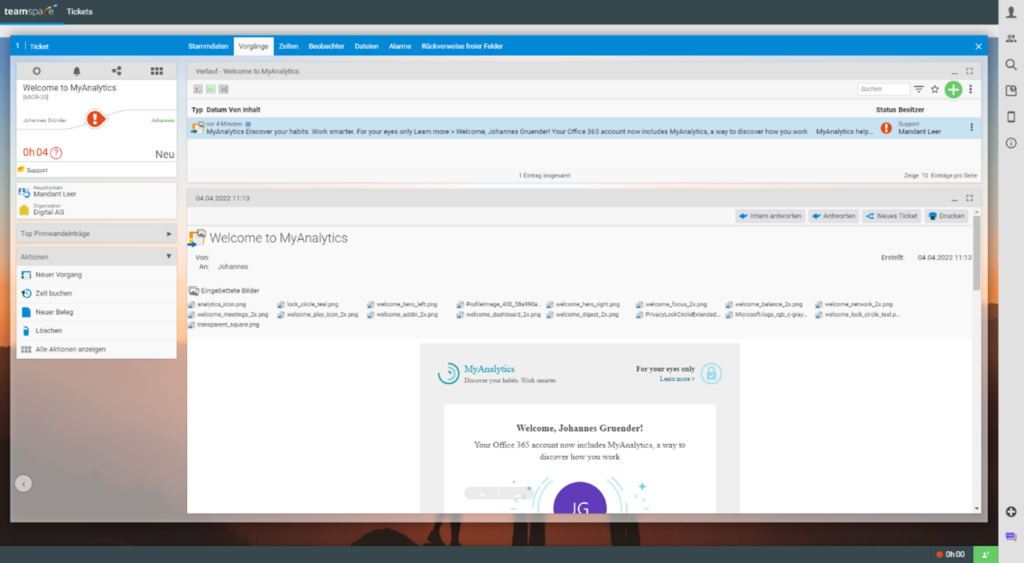
![Preview card of the add-in right after ticket creation: subject 'Welcome to MyAnalytics', ticket ID [MICR-20], responsible Johannes (Support), elapsed time '0h 00' and status 'New'](/images/de/legacy/outlook-add-in/bild16.png)
When you create a new ticket through the teamspace add-in, the work area is updated only a few seconds after the click on “Create ticket from message”. The application communicates with the host system and creates a preview card with the loaded information.
By clicking the preview card, the corresponding ticket opens in the teamspace system in a new browser window – provided you are already signed in to your teamspace host system in the browser. If not, you are first redirected to the login area and have to sign in.
Processing status of the ticket
![Ticket card of the add-in with numbered areas: subject (13), ticket ID [5p-161704] (14), contact Johannes Gründer (15), status icon (16), responsible Christoph (17), owner Johannes (18), channel Support (19), elapsed time 0h 30 (20), status 'In progress' (21) and below it the 'Latest activity' section (22)](/images/de/legacy/outlook-add-in/bild18.png)
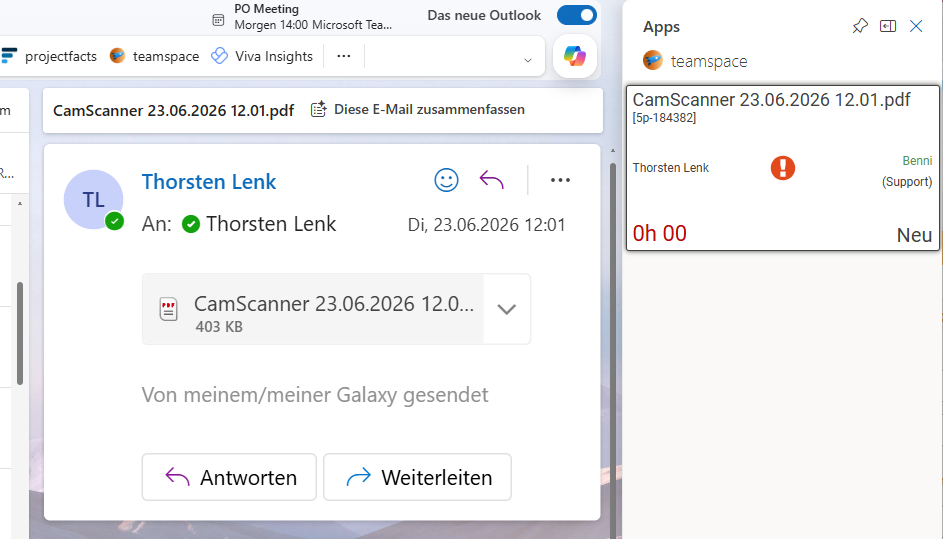
Through the work area of the teamspace add-in you can view information about the tickets in your Outlook inbox. The ticket card shows the following data:
- Subject of the message (13)
- teamspace ticket ID (14)
- Contact of the message matched by teamspace (15)
- The icon of the ticket status (16)
- The person responsible for the ticket (17)
- The ticket owner (18)
- The ticket channel (19)
- The time since the ticket was created, in case of internal responsibility (20)
- The ticket status (21)
If the ticket has just been created, the section “Latest activity” (22) is not visible yet. However, if you select a message that already refers to a ticket, this section appears – depending on whether a further ticket activity has taken place since creation or not.
If at least one further ticket activity exists, the section is loaded and displayed with the data of the respective latest activity. It contains:
- Creator of the activity
- Creation date
- Owner of the activity
- Content of the activity
Automatic update
To take over changes from the host system, there are several triggers in the add-in that provide for automatic updates in the application. These triggers make sure that all changes in the teamspace host system are also updated directly in the application.
Recently used tickets: if an email is selected that has not been transferred to the host system yet, the recently used tickets are loaded automatically and are available for selection. If necessary, this field can also be refreshed manually by choosing the last option.
Ticket channels: when you open the work area, the add-in automatically takes over changes regarding the ticket channels. If a new ticket channel was created in the teamspace host system, or the workflow of an existing channel was changed, these changes are taken over automatically.
Ticket statuses: the statuses of the tickets are stored (cached) on the client side in the teamspace add-in and are synchronised automatically with the ticket channels when you open the work area. When switching the ticket channel, the statuses and the associated workflows are reloaded into the application’s cache automatically.
Possible ticket owners: when switching the ticket channel, the possible owners of the ticket are determined again and offered as options for selection.
Version numbers: opening the settings makes sure that new version numbers are taken over automatically.
Work area: the content of the work area is always updated as soon as another message is selected or the work area is opened.
Support
If errors or problems occur while using the add-in, you can reach the support page in the settings with a click on the link given there (23).
In a support case, please always state the version numbers so that we can find a solution to the problem faster.
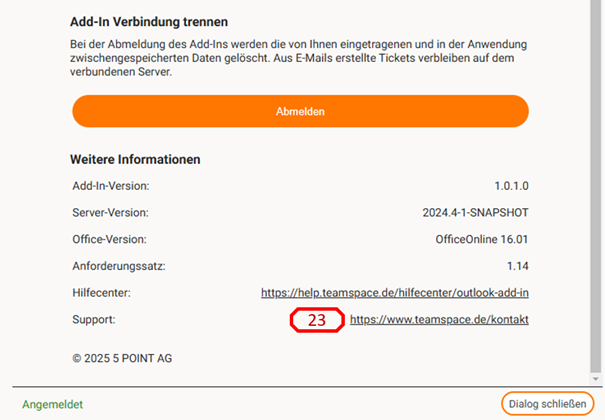
Signing the add-in out
If you no longer need the add-in on your current platform, you can sign it out at any time. Signing out means that all person- and host-system-related data is deleted on the add-in’s side.
To sign the add-in out, click the “Sign out” button under “Settings” in the section “Disconnect add-in”. After the first click you have to confirm the process (24).
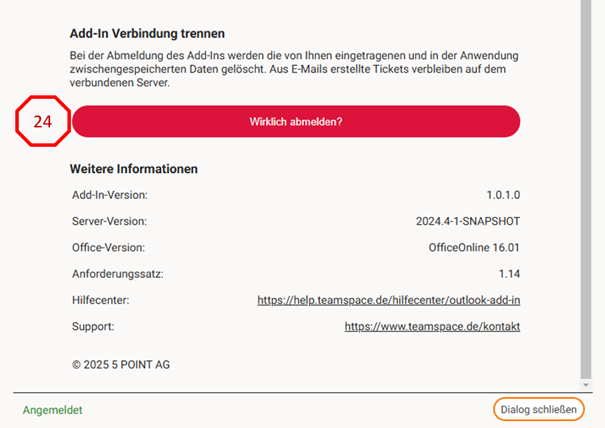
This process has no effect on the tickets created by the add-in – they remain in the teamspace host system.
By signing the add-in out, however, the host system receives a signal to delete the device from the user devices.
Related topics
- Create tickets Ticketing How-to
- Ticketing system basic configuration Ticketing Configuration
- Outlook add-in